Upload videos for use in a recorded event
To include videos in a recorded event, upload them to your event content. Then in the editing studio, add videos to the event timeline and publish the event. For more information, see Assemble or edit an event recording.
When you upload a video for a recorded event, you must designate where it will be played: upload it either as a Primary Media Clip or an Overlay Video. An Overlay Video plays on top of the audience event window and is designed to be supplementary content on an event (example - commercial or promotional video). A Primary Media Clip plays in the video player (where you see presenter webcams during a Live event) and is designed to be the primary content on an event.
Notes:
- Recorded events require at least one primary media clip. Overlay videos can’t be used as the sole event content.
- For audio only broadcasts, you can only upload videos as overlay videos. The video player is used to display presenter headshots and play audio clips. For more information, see Upload audio clips for use in a recorded event.
- Include as many overlay videos as you like and up to 10 primary clips. Each video can be up to 10 GB, must be at least 15 seconds long, and must include an audio track.
For more information about video requirements, see Overlay Video Specs and Requirements and Primary Media Clip Specs and Requirements.
Jump to: Upload a primary media clip | Upload an overlay video
Upload a primary media clip
To avoid distortion, upload primary media clips with the same aspect ratio as the video player (16:9 for video bridge broadcasts; 4:3 or 16:9 for webcam and encoder).
To add a primary media clip to an event:
- Sign in to the Webcast Admin portal and edit the event.
- On the left panel, click the Event Content tab.
- Under Media Clips, click Upload a Clip.

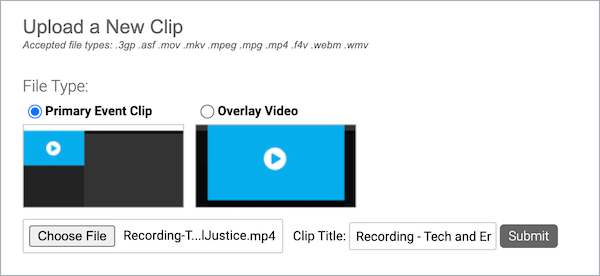
- In the Upload a New Clip window, select Primary Event Clip as the file type, click Choose File, select the clip, and then click Submit.
Note: The clip title is automatically generated based on the file name. You can change the title before clicking Submit.
- After the clip has finished uploading, an Upload Successful message is displayed to let you know that the clip is being transcoded by the system. Click Ok.
The clip is displayed in the Primary Media Clips section with a processing status. Once the clip has finished processing, you can optionally change the title.

- Upload additional videos. When finished, click Save and Continue to save changes to the event content.


Upload an overlay video
To upload a video to an event:
- Sign in to the Webcast Admin portal and edit the event.
- On the left panel, click the Event Content tab.
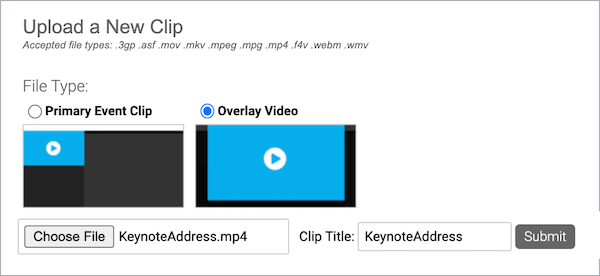
- Under Media Clips, click Upload a Clip.
- In the Upload a New Clip window, select Overlay Video as the file type, click Choose File, select the clip, and then click Submit.
Note: The clip title is automatically generated based on the file name. You can change the title before clicking Submit.

- After the clip has finished uploading, an Upload Successful message is displayed to let you know that the video is being transcoded by the system. Click Ok.
The video is displayed in the Overlay Videos section with a processing status. Once the video has finished processing, you can optionally change the title.

- Upload additional videos. When finished, click Save and Continue to save changes to the event content.