Set up Guest Administrator accounts
After scheduling an event, invite your presenters, moderators, and schedulers and give them Guest Administrator access to allow them to manage aspects of the event. To create Guest Administrator accounts, you must create Guest Admin Access Types. Access Types allow you to set permissions for multiple Guest Administrator accounts at once. For each Access Type, you can allow Guest Administrators to upload event content, edit the On-Demand event or replay, deliver the event, manage Q&A, and generate event reports.
Note: To limit what Guest Admins can see and do during the Live event, see Limit presenter actions in the Live Studio.
There is no maximum number of Guest Administrators that can join the Live Studio for an event. However, if the event is using Video Bridge or Telephone as the acquisition source, only 20 presenters will be able to join the bridge.
To create Access Types and Guest Admin accounts:
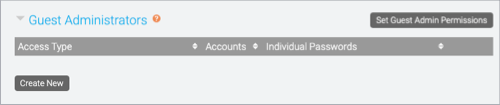
- On the Event Summary page, select Guest Administrators and under Access Type, click Create New.
- In the Create Guest Admin Type window, keep individual passwords enabled.
Note: You cannot create individual Guest Admin accounts if you disable Individual Passwords. Instead, presenters will share a PIN and use it to sign in to the event.
- Select the event activities you want to give Guest Admins access to. You can select:
- Live Studio to join and deliver the Live event.
- OD Studio to upload media clips and headshots to the On-Demand event or replay, and edit the event timeline.
- Reports to generate Audience Details and Event Analytics reports for the event.
- Content to upload slides, event resources, and headshots (audio events only).
- Q&A Only to manage Q&A for a Live or Simulated Live event.
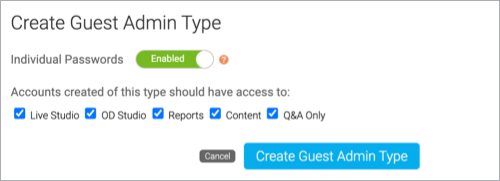
- Click Create Guest Admin Type.
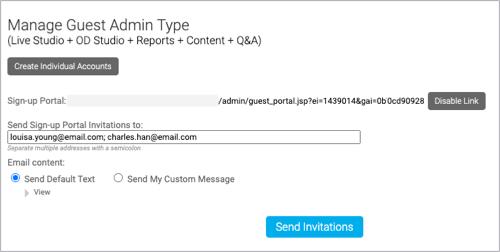
- In the Manage Guest Admin Type window, click either:
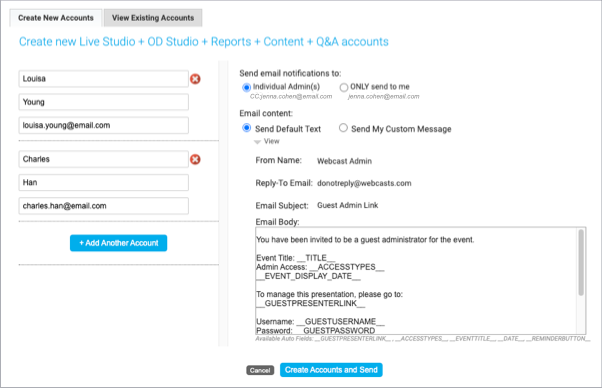
- Create Individual Accounts to set up accounts for each of your Guest Admins. Enter their names and email addresses. Click + Add Another Account to create more accounts. Select who you want to send email notifications to and the email content you want to send, and click Create Accounts and Send.
Note: By default, emails are sent to yourself and to individual Guest Admins. Select ONLY send to me to send the email to yourself. Click Send My Custom Message to edit the email content.

- Enable Sign-up Portal to allow Guest Admins to register for the event and create their own accounts. In the Send Sign-up Portal Invitations to box, enter the email addresses of the people you want to make Guest Admins and click Send Invitations.
- Create Individual Accounts to set up accounts for each of your Guest Admins. Enter their names and email addresses. Click + Add Another Account to create more accounts. Select who you want to send email notifications to and the email content you want to send, and click Create Accounts and Send.
- Repeat these steps to add additional accounts with different access levels. Each Access Type you create displays in the Guest Administrators section where you can add new and manage existing accounts. To add new Guest Admin accounts to an Access Type, click Manage Admins or the Edit button.
After you've created the accounts, Guest Admins receive an email with a link to the Guest Admin site where they can manage the event.


To update a Guest Admin account:
- In the Guest Administrators section, next to an Access Type, click Manage Admins.
- Click the View Existing Accounts tab.
- Next to a Guest Admin account, you can click the:
- Reset Password to send a new Guest Admin email with a new, randomly generated password.
Note: Existing passwords cannot be resent. Accounts that require resending login details will receive a new password from the system and the old password will no longer be valid.
- Edit button to change the name on the account.
- Delete button to remove the account from the Access Type.
- Reset Password to send a new Guest Admin email with a new, randomly generated password.