Number
|
Feature
|
Description
|
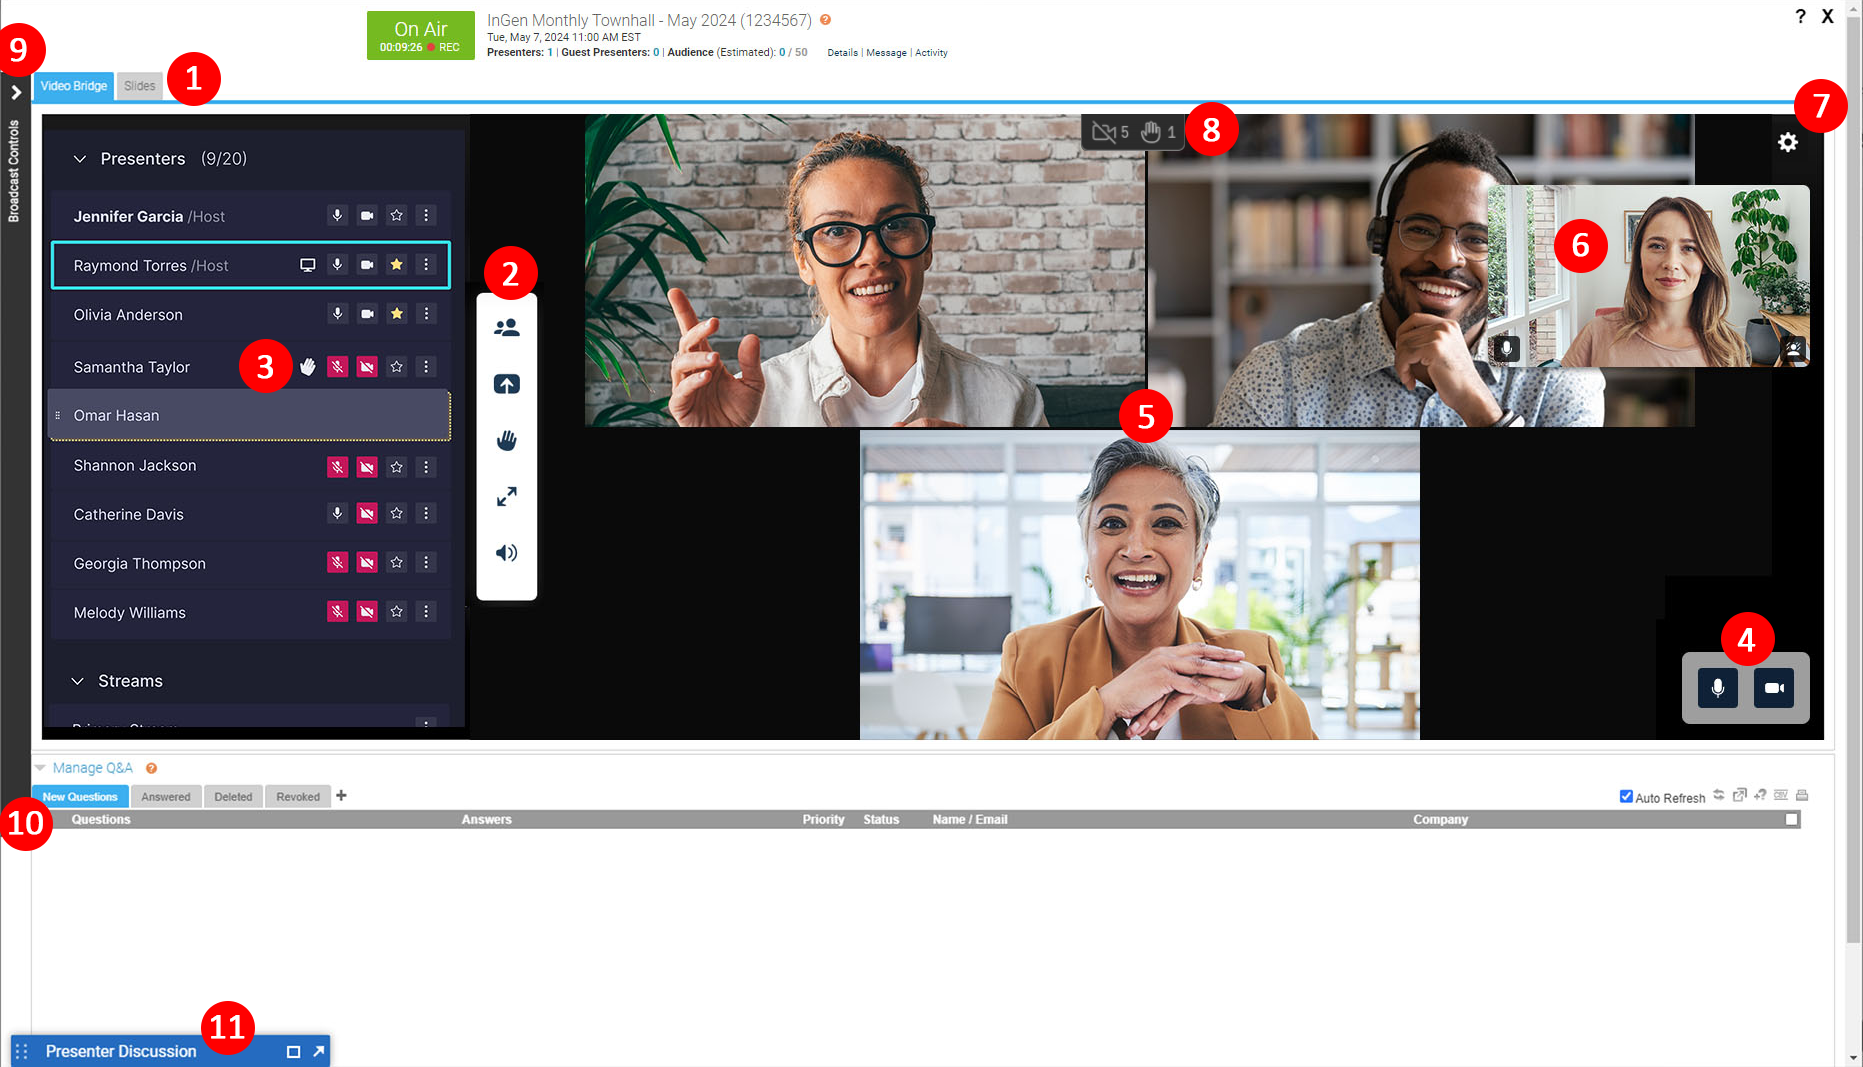
| 1 |
Live Studio Tabs |
Controls for different aspects of the event are grouped into tabs. Click the Video Bridge tab to manage your own webcam and audio, select a layout, and to manage presenter webcams and audio.
Controls for Slides, Surveys, Overlay Videos, and other content you uploaded to the event are displayed in their own tabs next to the Video Bridge tab.
|
| 2 |
Video Bridge Controls
|
Select from the available options to access controls:
|

|
Select to display the Presenter List and controls for managing presenter connections. |
|

|
Select to share your screen with viewers.
|
|

|
Select to raise your hand to get the attention of the host/moderator.
|
|

|
Select to display the Video Bridge is full-screen view. Press Esc to exit full-screen view.
|
|

|
Select to mute your local playback of the event's audio stream. |
|
| 3 |
Presenter Options |
Next to each presenter connection, you may see the following icons:
|

|
Indicates a presenter's microphone is unmuted. |
|

|
Indicates a presenter's microphone is muted. |
|

|
Indicates a presenter's microphone is unmuted. |
|

|
Indicates a presenter's microphone is muted. Presenters with a muted camera will be prevented from appearing in the video stream for the event. |
|

|
Indicates a presenter is not Spotlighted. |
|

|
Indicates a presenter is Spotlighted. Spotlighted presenters will be locked in the selected layout of event and override the default voice-activated switching. |
|

|
Indicates a presenter is sharing their screen. |
|

|
Indicates a presenter has raised their hand. Raising your hand can be used to get the attention of the event host/moderator. |
|

|
Click to access additional settings for a presenter's connection:
- Select Make Host to promote that presenter to the host role and all them the same controls as you have.
- Select Open DTMF Keypad to open a keypad used to control or manage an external meeting room or VCU connection.
- Select Edit Presenter Profile to update a speaker's name.
- Select Disable Receive Shares to stop shared screens or other third-party content streams from being visible to that presenter.
- If a presenter has raised their hand, use the Lower Hand option to remove that indicator.
- Select Remove Presenter to remove a presenter from the Video Bridge.
|
Below the Presenter list, after the streams for the Video Bridge have been connected in the Broadcast Controls, you will see a Primary Stream and Backup Stream listed. Click on the settings button next to a stream to access additional controls.
- Select Edit Stream Profile to change the stream name.
- Select Disable Receive Shares to stop shared screens or other third-party content streams from being visible to the audience.
- Select Remove Stream to disconnect that Video Bridge Stream from the event.
|
| 4 |
Local Presenter Controls |
Presenters can use the available options to control their connection to the Video Bridge. Available options:
|

|
Use the microphone icon to mute/unmute your microphone. |
|

|
Use the camera icon to mute/unmute your camera. Muting your camera will prevent you from appearing on the video stream for the event. |
|
| 5 |
Active Speaker(s) |
The webcam of the presenter(s) will appear here. The number of speaker and layout of be determined by the layout selected by the Administrator. For more details on adjusting the layout of the Video Bridge, review this article: About Presenter Layouts
Voice-activated camera switching is used to highlight the webcam of the presenter who is speaking (and recent speakers when using multiple frame layouts). To choose whose webcams are on stage, review this article: Spotlight Presenter Webcams on the Video Bridge
|
| 6 |
Your Camera View |
A live view of your webcam. Hover over the window to access a button in the top right of the window to hide your self-view. Click and drag this window to another location on the Video Bridge to change where it appears locally. |
| 7 |
Advanced Settings |
Click on the gear icon to access the advanced settings menu. Available options:
- Select Meeting Layout to adjust the Layout of the Video Bridge. Options are grouped into a variety of layout types including Filmstrip, Grid, Speaker, Individual and Adaptive. Refer to our help articles for additional details on layout options. Click Save at the bottom to save any changes to the Video Bridge layout.
- Select Meeting Settings to access additional meeting settings. Enable "lock the meeting" to prevent presenters from automatically joining. Hosts will have the ability to approve or deny access to any presenters that try to join when the meeting is locked. Enable to "Show name labels" option to display a presenter's name on the Video Bridge for other presenters and the audience to see. Presenter's names can be edited by clicking on the settings button next to the speaker in the Presenter List.
- Select Video and Sound to access controls to select or change your camera, microphone and audio playback sources. Enable "Voice Focused Noise Suppression" to suppress background noise on your connection. Enable "Prioritize Sharing Video" to prioritize motion over sharpness when sharing content with other participants. This is the best option when sharing video through screenshare as the motion will be smoother. When sharing static presentations or images, leave the option disabled to prioritize sharpness. Click Save to apply any changes to these settings.
- Select Quality to adjust your connection quality. This setting impacts the amount of bandwidth required by the presenter. It is set to Auto by default, so the quality will automatically adjust based on a presenter's connection, but it can be manually adjusted using the dropdown here.
- Select Accessibility to always display Video Bridge controls. By default, controls will fade away after a few seconds of inactivity, but this setting will keep the controls displayed at all times.
- Select Media Statistics to see statistics on your connection. This will allow you to see the overall connection quality, along with details like packet transmission, packet loss and jitter. It is helpful to review these statistics if a presenter is having issues with their connection.
- Select Download Log to download a log with details on your connection to the Video Bridge. If a presenter encounters issues with their Video Bridge connection, it's recommended to download the log here before exiting the Live Studio. The Video Bridge log will be helpful to investigate any issues encountered
- Select Dial Out to a Presenter to add an external participant to the Video Bridge. This option allows you to enter a SIP, H.323, Skype for Business or teams address to connect an external presenter or meeting room or enter a RTMP stream to send the video stream to an external service. Refer to our help articles or contact Support if you have any additional questions to adding an external source.
|
| 8 |
Bridge Indicators |
Small indicators display at the top center of the Video Bridge view in Live Studio to show important details about your presenters. These indicators are not broadcast to your audience.
 |
Presenter count: Total number of presenters when there are more than can be shown in the current layout
|
 |
Phone participants: Number of presenters connected by phone
|
 |
Muted cameras: Number of presenters with video off
|
 |
Raised hands: Number of presenters with a raised hand
|
|
| 9 |
Broadcast Controls |
Controls to connect the Video Bridge and start/end the event. Access the Broadcast Controls using the > icon access the options to manage the event.
For instructions on connecting a Video Bridge and starting/ending the event, review this article: How do I broadcast using the Video Bridge?
|
| 10 |
Manage Q&A |
Use the Manage Q&A section to manage the Q&A on the event.
For additional information on Q&A, review this article: About Q&A
|
| 11 |
Presenter Discussion |
Use the Presenter Discussion to have a private chat with presenters before and during the event. |