Use the text editor to customize events and emails
Jump to: Add images | Add speaker headshots | Add links | Embed videos | Add a Twitter feed
When you select the Custom option for the landing page content, footers, custom players tabs, and event emails, it opens the text editor.
The following table shows the elements you can customize and the content you can add.
| Element | Go to this tab and select... | Things you can add |
|---|---|---|
| Landing Page Content | Registration tab. Landing Page Content > Landing Text > Custom | Text, images, links, videos, speaker details |
| Registration Footer | Registration tab. Registration Footer > Edit Registration Page Footer | Text, images, links, videos, speaker details, Twitter feed |
| Player Footer | Event Content tab. Player Footer > Manage Player Footer | Text, images, links, videos, speaker details, Twitter feed |
| Custom Player Tabs | Event Content tab. Add Custom Player Tabs | Text, images, links, videos, speaker details, Twitter feed |
| Registration Confirmation, Event Reminder, and Follow-up Emails | Email & Marketing tab:
|
Text, images, links |
Add images
To add images:
- On the toolbar, click the Insert Image button.

- Click Choose File, select the image, and then click Upload.
- Optional. Resize, rotate, crop, or add text to the image before adding it. You can also add padding to the image by resizing the canvas and set the background color for the canvas.
- When finished editing, click Insert.
Add speaker headshots
Tell your audience about your presenters and add speaker details, including their photo, name, title, and company. Headshots must be at least 300x300 pixels and preferably the same height and width.
To add headshots:
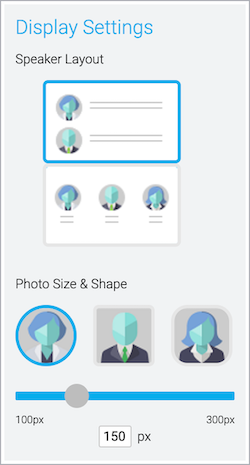
- On the toolbar, click the Speaker Details button.

- Under Display Settings, choose a layout for the speaker details, select the image shape, and use the slider to set the headshot image size.
- Under Speaker List, in the Photo column, click Upload Photo.
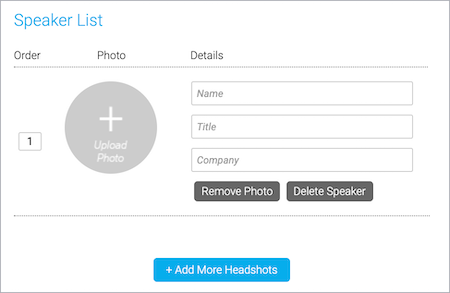
- Click Choose File, select the image, and then click Upload.
- If your image is a rectangle, point to the image and drag to center it within the guides, and then click Apply to crop the image.
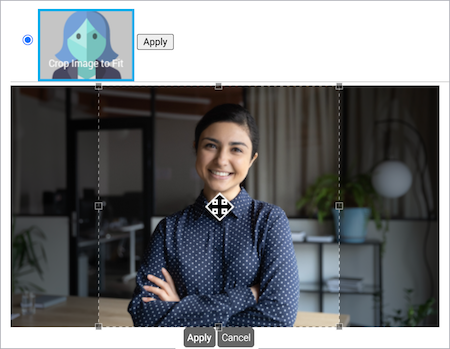
- Optional. Rotate or add text to the image.
- Click Save.
- In the Details column, enter the name of the presenter, their title, and company name.
- To add details for another presenter, click + Add More Headshots and repeat steps 3 to 8.
- When finished, close the Add Speaker Details window.
Add links
To add links:
- On the toolbar, click the Insert Link button. To turn text into a link, type the text and select it, and then click the Insert Link button.

- Enter the URL and link text.
If you highlighted the link text, it is already entered in the Text field.
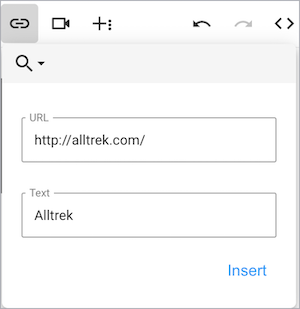
- Click Insert.
Embed videos
You can embed a video from YouTube, Vimeo, and Brightcove using its shareable URL.
To embed videos:
- On the toolbar, click the Insert Video button.

- Enter the video URL. If the Autoplay option is available, you can select it to play the video when an attendee lands on the page.
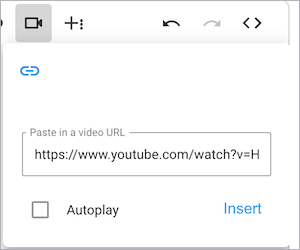
- Click Insert.
- Optional. By default, the video size is 640x360. To change the size of the video, click </> to switch to code view and change the height and width of the iFrame.
Add a Twitter feed
You can add a real-time feed of a Twitter timeline to the registration page footer and to the event window in the footer or as a custom player tab.
To add a Twitter feed:
- On the toolbar, click the Twitter button.

- In the Embed a Twitter Widget window, select User Timeline and enter the @username of the feed you want to embed.
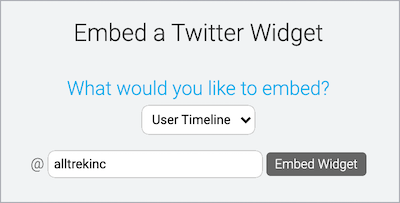
- Click Embed Widget.
- Optional. By default, the feed size is set to 100%. To change the size of the feed, click </> to switch to code view and change the height and width of the iFrame.