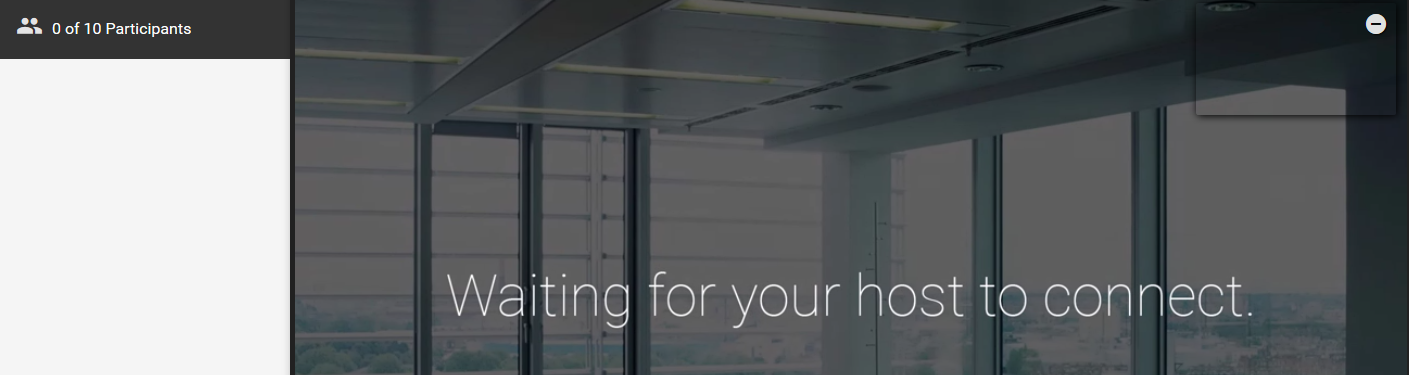
Troubleshooting
Troubleshoot audio and video quality and connection issues.
- Echo, Feedback or Distortion of Event’s Audio and/or Video
- Investigating a Presenter Issue
- Screen share not connecting or not displaying to viewers
- Telephone Events - Speaker Can't Connect
- Telephone Events - Bridge Disconnected / Issue with Bridge During Event
- VCU Events - Can't Connect / Sitting on "Connecting" Screen / "VCU Dial Out Failed" Message
- Video Bridge Events - Guest Presenter or Presenter Disconnected
- Video Bridge Events - Speaker Connectivity Issues
- Webcam broadcasts - Stream not connecting
- Webcam Events - Message stating "Access to your webcam is required to continue"
- Encoder Events - Cannot Connect or Connection Dropping
- Attendee FAQs
Echo, Feedback or Distortion of Event’s Audio and/or Video
If there is an issue with the audio and/or video quality, start by determining if it is an issue with a presenter’s telephone line or video feed or a local playback issue for a viewer. Issues with the event's audio/video stream will impact the entire audience. In this case, you would see a large volume of reports of issues accessing the event. Local playback issues may be isolated to a small percentage of the audience due to a problem with their computer, network or internet connection. In this case, you would see a single report or a few reports of issues.
Audio Events
For audio events, you can test the audience stream by clicking on the gear icon in the Presenter Bridge section of the Live Studio.

In the pop-out window, click on the Play button to listen to the stream the audience will hear.

If there is an issue with an individual presenter's line, it should impact their audio only. In this case, have the presenter hang out or disconnect and join the Presenter Bridge again. If the issue persists, have them use another phone line. If there is an issue with the phone bridge, it should impact all presenter's audio. In this case, follow the troubleshooting steps below. To confirm another line is not impacting other presenter's audio, it is recommended to have all speakers mute their lines locally to avoid feedback or an echo. Have each presenter unmute and test their audio individually to identify the problematic line.
If there is an issue with the phone bridge (not an individual speaker line) and the event was set up with a Back-up Phone Bridge, you will see a gear icon by the Presenter Bridge information in the Live Studio.
Click on the gear icon and click Switch Audio Source to Alternate Bridge to switch to the event’s back-up phone bridge.

Follow the instructions to dial-in, connect and switch to the back-up bridge. Click Set as Webcast Audio Source to switch the bridge on the event.

Speakers will then be prompted to disconnect and dial into the new bridge.
Video Events
For video presentations, make sure you are using a wired internet connection to present and close any unneeded programs running on your computer. It's recommended to disconnect from a VPN if you are connected to one. If the audio or video issue is being experienced by the entire audience, follow the instructions below based on the video acquisition being used:
Video Bridge Events
If the issue is related to a single presenter, have the presenter close the Live Studio and reconnect to the Video Bridge. If the issue persists, have the presenter try to use a different camera and/or microphone source. If the issue is related to all presenters, switch to the Backup Stream in the Broadcast Controls section of the Live Studio. Click on the Backup Stream box to activate it on your event.
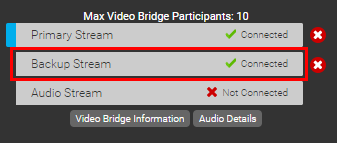
If the issue persists, use the red x next to the Primary and Backup Stream to reconnect the Video Bridge to the event.
Webcam Events
Have the presenter close the Live Studio and reconnect to their webcam. If the issue persists, have the presenter try to use a different camera and/or microphone source.
Encoder Events
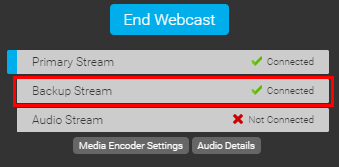
If a Backup Stream has been connected, switch to the Backup Stream in the Broadcast Controls section of the Live Studio. Click on the Backup Stream box to activate it on your event. If the issue persists, ensure there isn't an issue with the Encoder source delivering the video feed and restart the Encoder as needed.
VCU Events
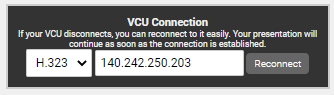
Have the presenter use the Reconnect button to reconnect the VCU to the event. If the issue persists, ensure there isn't an issue with the VCU source delivering the video feed and restart the VCU as needed.
Investigating a Presenter Issue
To investigate a presenter issue, please have the presenter capture the details below. For self-service presentations, provide this information to Support for investigation. For managed presentations, provide this information to your Production Manager.
- Event ID of presentation
- Description of issue
- Screenshot of the issue (if possible)
- Screenshot of System Test results (link below)
- Screenshot of WebRTC Test results (if applicable, link below)
System Test: https://event.webcasts.com/test/advanced
- Allow up to 30 seconds for the test to complete before taking a screenshot of the results.
WebRTC Test (Chrome-Webcam and ScreenShare Events Only): https://www.webcasts.com/test/webrtc.asp
- Click Start at the top of the test. Allow up to 30 seconds for the test to complete before taking a screenshot of the results.
Screen share not connecting or not displaying to viewers
This troubleshooting article addresses issues related to screen sharing.
Issue
You’re a presenter and you start screen share, but it doesn’t connect so that you can broadcast your screen (Live Screen Share displays a message that you are no longer sharing your screen with the audience). Or, you’re screen sharing and viewers can’t see what you're sharing.
Resolution
- Join the Live Studio with a Google Chrome browser
- Make sure you meet the network requirements for Screen Sharing listed here: https://www.webcasts.com/networkresources/
- Use a wired internet connection
- Disconnect from the VPN
To allow Chrome access to your camera and microphone:
- At the top of the Live Studio window, to the left side of the web address, click the Lock
 button.
 - Next to Camera and Microphone, select Allow.

If viewers still can’t see your screen, close any programs that could be using your webcam and make sure none of these programs are running in the background.
Telephone Events - Speaker Can't Connect
Connecting using Phone Audio
If you would like to connect to the Presenter Bridge using your telephone, select the Phone Audio tab in the Presenter Bridge section. The system should display a local dial-in number and Passcode for the presenter. Presenters can use the dropdown to select another country number as desired.

If you have issues connecting to the Presenter Bridge:
- Double-check the Presenter Bridge number and passcode to ensure you are using the correct information.
- Make sure your phone does not have any calling restrictions (ex. dial 9 to make an external call).
- Try to connect using another phone if possible.
- Switch to a VoIP connection if the issue persists.
Connecting using Computer Audio (VoIP)
If you would like to connect to the Presenter Bridge using computer audio (VoIP), select the Computer Audio tab in the Presenter Bridge section. The system will display a Microphone and Speaker dropdown to allow you to select the sources that will be used.
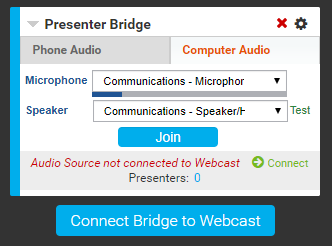
The audio from the selected Microphone will be registered with a blue bar directly below the Microphone dropdown. Click Test next to the Speaker dropdown to test the audio playback. Once your Microphone and Speaker have been tested, click Join to connect to the Presenter Bridge
If you have issues connecting to the Presenter Bridge:
- Make sure a valid Microphone and Speaker have been selected in the setup. Choose a new source and re-join the bridge.
- If you are using a corporate network or connected to a VPN, this may introduce network restrictions that prevent you from connecting.
- If you are using a VPN, disconnect from the VPN and try again.
- If you are using a corporate network, refer to the network requirements. Your IT team may need to make updates on your network to allow you to connect.
- If you have issues staying connected to the Presenter Bridge, check your internet connection. Computer Audio (VoIP) relies on your internet connection to deliver the audio to/from the Presenter Bridge. Any issues with your internet connection will impact your connection to the Presenter Bridge.
Telephone Events - Bridge Disconnected / Issue with Bridge During Event
If there is an issue with an individual presenter's line, it should impact their audio only. In this case, have the presenter hang out or disconnect and join the Presenter Bridge again. If there is an issue with the phone bridge, it should impact all presenter's audio. In this case, follow the troubleshooting steps below. To confirm another line is not impacting other presenter's audio, it is recommended to have all speaker mute their lines locally to avoid feedback or an echo. Have each presenter unmute and test their audio individually to identify the problematic line.
If there is an issue with the phone bridge (not an individual speaker line) and the event was set up with a Back-up Phone Bridge, you will see a gear icon by the Presenter Bridge information in the Live Studio.
Click on the gear icon and click Switch Audio Source to Alternate Bridge to switch to the event’s backup phone bridge.
Follow the instructions to dial in, connect and switch to the backup bridge. Click Set as Webcast Audio Source to switch the bridge on the event.
Speakers will then be prompted to disconnect and dial into the new bridge.

VCU Events - Can't Connect / Sitting on "Connecting" Screen / "VCU Dial Out Failed" Message
This troubleshooting article addresses issues related to the VCU stream not connecting to the event.
Issue
The moderator is unable to connect the VCU stream to the event when dialing out to the VCU from the Live Studio or when dialing in to the event. Can’t Connect / Sitting on "Connecting…" Screen / "VCU Dial Out Failed" Message
Resolution
- Make sure your system meets the minimum system requirements
- Review our network requirements and make sure the ports and IP ranges in the Webcast Presenters - Video Events column are permitted. If you're unsure of your settings, contact your IT Administrator.
- Make sure your VCU accepts inbound connections. If you're unsure of your settings, contact your IT Administrator.
- Make sure you have selected the correct protocol (SIP or H.323) for your VCU. If your VCU supports URI or IP calling, try both options.
- Make sure you're using the correct SIP or H.323 address and that there are no typos.
- Make sure your VCU doesn’t require a PIN to be included in the address. This information can be accessed in your VCU setup.
- Make sure the VCU is on and streaming an audio or video feed.
- Disconnect the VCU from any other calls.
- Use a wired internet connection
- Disconnect from the VPN
Still need help? Contact Support for assistance.
Video Bridge Events - Guest Presenter or Presenter Disconnected
If a Guest Presenter is dropped from the bridge, check to make sure an Admin has joined the Video Bridge in the Live Studio. An Admin needs to join the Video Bridge to connect and start the presentation. If an Admin has not joined the Video Bridge, you will see a notification in the Video Bridge.
If any Presenter is dropped from the bridge, please check your internet connection. Individual presenters disconnecting is typically related to an issue with their internet connection. We recommend using a wired connection to ensure a solid, stable connection while broadcasting your video. If you are connected to a VPN, please disconnect before joining the Video Bridge.
Video Bridge Events - Speaker Connectivity Issues
This troubleshooting article addresses issues related to a presenter's audio or video stream not connecting to the video bridge.
Issue
In the Live Studio, presenters are unable to connect their video stream to the video bridge.
Troubleshooting
Before connecting to the Video Bridge, select your desired camera and microphone in the setup.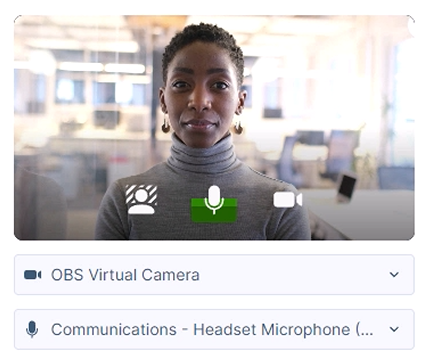
A preview of your selected camera will display. The microphone icon at the bottom of the video preview serves as an audio meter to confirm your audio is being received. Make sure you see your camera preview and audio being registered before connecting.
If your camera and/or microphone is not working, check the following:
- Ensure your Operating System and Internet Browser are not blocking access to your Camera or Microphone.
- Check your camera and microphone permissions for Windows or Mac (camera, microphone).
- For allowing access in Google Chrome, click here.
- For allowing access in Microsoft Edge, click here.
- Close any programs and other browsers that could be using your webcam and make sure none of these programs are running in the background. You can also restart your computer. This should help ensure your devices aren't being used by another program and will also help improve your computer's performance.
If you are able to select your desired devices but encounter issues connecting to the Video Bridge or are able to connect but cannot be seen and/or heard (or see/hear others), there could be several reasons related to your computer’s performance, internet connection, or application conflicts. Below are troubleshooting steps to help resolve the issue:
- Check Your Internet Connection
In addition to your computer’s resources, a stable and fast internet connection is crucial for connecting to a Video Bridge event. Checking the following:
-
- VPN: Disconnect from VPN if you are using one.
- Wi-Fi: If you’re on Wi-Fi, try switching to a wired connection for more stability.
- Bandwidth: Ensure no other devices or applications are using significant bandwidth (e.g., streaming videos, large downloads).
- Speed Test: Run an internet speed test to check your connection’s download and upload speeds. For webcasts, an upload speed of at least 3-5 Mbps is recommended.
- Make sure your system meets the minimum system requirements.
- Review our network requirements and make sure the ports and IP ranges in the Webcast Presenters - Video Events column are permitted. If you're unsure of your settings, contact your IT Administrator for assistance.
- Check Your Computer’s Resources
Your computer’s resources—such as CPU usage, memory (RAM), and disk space—are critical when connecting to a video conference or webcast. High resource usage can cause delays, poor performance, or failure to connect.
How to Check Your Computer’s Resources (Windows)
- Open Task Manager:
- Press Ctrl + Shift + Esc to open Task Manager.
- Review Resource Usage:
- Under the Performance tab, you’ll see graphs displaying CPU, memory, disk, and network usage.
- If CPU or memory is near 100%, this could affect your ability to connect to the event.
- Close Resource-Intensive Processes:
- Click on the Processes tab to see a list of running applications and background processes.
- Sort the list by CPU or Memory to identify any applications that are using too many resources.
- Right-click on a high-usage process and select End Task to close it.
- Open Task Manager:
How to Check Your Computer’s Resources (Mac)
-
- Open Activity Monitor:
- Go to Applications > Utilities > Activity Monitor.
- Review Resource Usage:
- In Activity Monitor, select the CPU and Memory tabs to see your system’s resource usage.
- Look for processes consuming a large amount of CPU or memory.
- Close Resource-Intensive Applications:
- Highlight any app that’s using a disproportionate amount of resources, then click the X in the top-left corner of the Activity Monitor window to quit the app.
- Highlight any app that’s using a disproportionate amount of resources, then click the X in the top-left corner of the Activity Monitor window to quit the app.
- Open Activity Monitor:
- Shut Down Web Meeting Tools Like Teams, Zoom, and WebEx
Web meeting tools like Microsoft Teams, Zoom, and Cisco WebEx consume significant system resources, even when you're not actively using them. These tools often run background processes that could be affecting your connection.
Microsoft Teams
-
- Exit the Teams Application:
- Right-click the Teams icon in the system tray (Windows) or menu bar (Mac).
- Select Quit or Close.
- End Background Processes:
- Open Task Manager (Windows) or Activity Monitor (Mac) as described above.
- Look for any background processes related to Teams (e.g., Teams or Teams Updater), and end these tasks if necessary.
- Exit the Teams Application:
Zoom
-
- Exit the Zoom Application:
- Click on the Zoom icon in your system tray or menu bar.
- Select Exit Zoom (Windows) or Quit Zoom (Mac).
- End Background Processes:
- In Task Manager or Activity Monitor, look for any Zoom processes running in the background and terminate them.
- Exit the Zoom Application:
WebEx
-
- Exit WebEx:
- Right-click the WebEx icon in the system tray (Windows) or menu bar (Mac).
- Select Quit WebEx.
- End Background Processes:
- In Task Manager or Activity Monitor, look for WebEx or Cisco WebEx processes and end them if they’re still running.
- In Task Manager or Activity Monitor, look for WebEx or Cisco WebEx processes and end them if they’re still running.
- Exit WebEx:
- Disable Resource-Intensive Applications
Some applications and services consume significant CPU, memory, or network resources. Disabling these apps before connecting to a webcast or video conference can help ensure a smoother experience.
Examples of Resource-Intensive Applications:
-
- Web Browsers:
- Browsers, especially when multiple tabs are open, can consume a lot of memory. Close any unnecessary browser tabs or windows.
- File Syncing Services:
- Apps like Dropbox, Google Drive, or OneDrive sync files in the background and can use significant bandwidth and CPU. Disable syncing temporarily if not needed during the event.
- Cloud-Based Backup Tools:
- Backup tools such as Carbonite or Backblaze often run continuously, performing background backups. These can be paused or disabled during the event.
- Gaming Software:
- If you have software like Steam or Epic Games Launcher running in the background, close them as they can use a significant amount of resources.
- Video Editing or Rendering Software:
- Applications such as Adobe Premiere, Final Cut Pro, or DaVinci Resolve can use a large portion of your CPU and memory when running. Close these programs during the webcast.
- Disable any security software running on your device (Examples: Zscaler and Netskope).
- Web Browsers:
How to Disable Apps (Windows)
-
- Open Task Manager (Ctrl + Shift + Esc).
- End Background Applications:
- Go to the Processes tab and identify any applications consuming a high amount of resources.
- Right-click on these applications and select End Task.
- Disable Startup Programs:
- In Task Manager, go to the Startup tab.
- Disable unnecessary apps that may automatically start when Windows boots.
How to Disable Apps (Mac)
-
- Quit Apps:
- In the Activity Monitor, highlight resource-heavy apps and click the X to quit them.
- Disable Startup Programs:
- Go to System Preferences > Users & Groups.
- Select your user account, and click the Login Items tab.
- Uncheck any apps you don’t need to run at startup.
- Quit Apps:
Network restrictions typically require assistance from your local IT and may not be able to be resolved without advanced notice. In this case, using a public internet connection and/or a personal computer should resolve the issue. You can use these work arounds to resolve the connection:
- Try to connect using an public/unrestricted network or your phone's hotspot, rather than a corporate network, for your internet connection.
- Try using a personal laptop, rather than a company provided device, as your computer source.
Still need help? Contact Support for assistance.
Connecting Using Skype
- For Lync/Skype for Business users: Your company may block access to external locations, which would prevent you from connecting to the Video Bridge. Below is a link to update your Lync/Skype for Business settings to allow external access. Depending on your setup, this may require your IT department to allow access (Lync/Skype for Business). Help Information: https://support.office.com/en-us/article/Allow-users-to-contact-external-Skype-for-Business-users-b414873a-0059-4cd5-aea1-e5d0857dbc94
- For regular Skype users: You need to provide an email address for your Skype account to connect. Make sure your Skype account is associated with a Microsoft email address to utilize Skype on the Video Bridge (Skype Acquisition).
Webcam broadcasts - Stream not connecting
This troubleshooting article addresses issues related to connecting the webcam stream to the event.
Issue
You're a moderator and you connect the webcam stream, but it doesn't connect so that you can start the event. The connecting screen displays the video player, but your webcam stream is never connected.
Resolution
If the webcam stream won't connect:
- Make sure your system meets the minimum system requirements
- Make sure you meet the network requirements for Webcam broadcasts in the Webcast Presenters - Video Events column
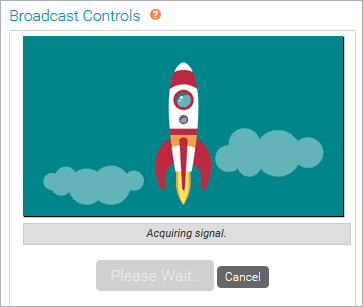
- In the Broadcast Controls panel, click Cancel, make sure an audio and video source has been selected, and reconnect the stream
- Use a wired internet connection
- Disconnect from the VPN
- Install the latest version of your webcam driver
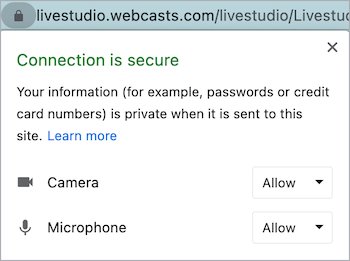
When you join the Live Studio, make sure your browser is allowing the Live Studio to access your webcam and microphone.
To allow your browser access to your camera and microphone:
- At the top of the Live Studio window, to the left side of the web address, click the Lock button.
- Next to Camera and Microphone, select Allow.

If you still can't connect your webcam stream, close any programs that could be using your webcam and microphone and make sure none of these programs are running in the background.
Still need help? Contact Support for assistance.
Webcam Events - Message stating "Access to your webcam is required to continue"
This message indicates that the computer’s video and audio sources are already in use or access is blocked. Please follow the troubleshooting steps below:
- You should see a prompt in the browser asking if you would like to use your webcam/microphone. Click Yes when prompted.
- Close any programs and other browsers that could be using your webcam and make sure none of these programs are running in the background.
- Check your browser’s settings to make sure the browser can connect to your webcam and microphone.
- For Chrome:
- At the top right, click Settings (three vertical dots).
- In the "Privacy and Security" section, click "Site settings".
- Under the "Camera" or "Microphone" options, select "Ask before accessing".
- To remove permissions you already granted/blocked to sites, click on the Camera or Microphone option. Make sure there are no “.webcasts.com” URLs listed as “Blocked”.
- For Firefox:
- Click on the Show Site Information button (top left of the browser next to the URL).
- Click on the arrow button next to the “livestudio.webcasts.com” name.
- Click More Information.
- On the Permissions tab, make sure the Use the Camera and Use the Microphone options are set to Use Default or Allow.
- For Microsoft Edge:
- At the top right, click Settings (three horizontal dots).
- Click on the Menu button in the top left (three horizontal lines).
- Select Site Permissions in the list.
- Under "Camera" or "Microphone," make sure they are set to Ask First.
- To remove permissions you already granted/blocked to sites, click the Camera" or "Microphone" option. Make sure there are no “.webcasts.com” URLs listed as “Blocked” in the Managed exceptions section.
- Internet Explorer is not supported for use with the Video Bridge as the Video Bridge requires your browser to support HTML5.
- For Chrome:
- Ensure your Operating System is not blocking access to your Camera or Microphone.
- For the Windows 10 Operating System, follow these instructions: https://support.microsoft.com/en-us/help/4468232/windows-10-camera-microphone-and-privacy
- For the Mac OS, follow these instructions:
If you continue to have issues, your network may be blocking access to your webcam. Please make sure you meet the network requirements.
Encoder Events - Cannot Connect or Connection Dropping
Encoder connections can occur for a variety of reasons. If cannot connect your encoder to an event or experience drops in connection, please follow the troubleshooting steps below:
Cannot Connect
If you cannot connect your encoder, please check the following settings:
- Confirm the Stream URL and Stream ID listed in the Media Encoder Settings of the Live Studio exactly match the stream settings of your encoder setup.

Specific things to check:
- Confirm there are no typos or extra spaces in the URL or ID.
- Make sure the Primary URL and Primary ID are used together (do not use the Primary URL with the Backup ID or vice versa).
- Double check the end of the Stream URL(s) to make sure it matches the URL in the Live Studio. If your event uses ABR (adaptive bitrate), the URL(s) will end with "/abr_live". If the event uses CBR (constant bitrate), the URL(s) will end with "/convey_live".
- It is not recommended to to save or reuse encoder profiles from past events as settings can change. Please enter the settings manually or, if you are using Wirecast, download the Wirecast profile next to each stream name.
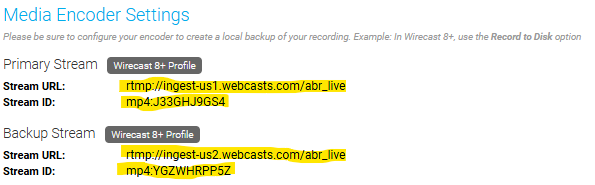
Note: If you are using secure RTMPS streaming instead, the Primary Stream and Backup Stream URLs need to be updated. Refer to the sample links before for an example (bolded text reflects the changes).
- Standard RTMP URL Format: rtmp://ingest-us1.webcasts.com/abr_live/mp4:ABCDEFGHIJ
- Secure RTMPS URL Format: rtmps://ingest-us1.webcasts.com:443/abr_live/mp4:ABCDEFGHIJ
Connection Dropping
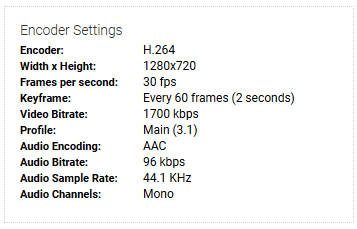
If you connect your encoder but experience issues with the encoder dropping/disconnecting, please check the following settings:
- Confirm the settings on your encoder profile matches the Encoder Settings listed in the Media Encoder Settings of the Live Studio. Specific things to check:

- Confirm the Video Bitrate and Audio Bitrate match the settings from the Live Studio. The recommended bitrates will vary based on the video window size selected in the Webcast setup.
- Note: using a higher bitrate can cause the stream to disconnect if the cap is reached.
- Note: using a higher bitrate can cause the stream to disconnect if the cap is reached.
- Confirm the Keyframe is set to Every 60 frames (2 seconds).
- Note: The name of this setting may vary based on your encoder. For Wirecast, this should be set to a "Key frame every 60 frames" based on a 30 FPS setting, and OBS should be changed from the default "0=auto" setting to a "2 s" Keyframe Interval.
- Note: The name of this setting may vary based on your encoder. For Wirecast, this should be set to a "Key frame every 60 frames" based on a 30 FPS setting, and OBS should be changed from the default "0=auto" setting to a "2 s" Keyframe Interval.
- Confirm the Encoder and Audio Encoding codecs are set to H.264 (video) and AAC (audio). It is recommended to use Main (3.1) for the Profile.
- Confirm the Video Bitrate and Audio Bitrate match the settings from the Live Studio. The recommended bitrates will vary based on the video window size selected in the Webcast setup.
Attendee FAQs
This article covers frequently asked questions about attending an event.
How do I register for the event?
In the event invitation, click the registration link. On the event landing page, enter your registration information and email address in the registration form and click Submit. If you don't see the registration form, click Register Now and then register. Once you register, you'll receive an email with the event details and the event link.
How do I join the event?
To join the event, you must first register for it. Once you register, you'll receive an email with the event details and the event link. Click the event link. On the event landing page, enter your email address and click Log In. If you don't see the Log In button, click Already Registered? and then log in.
How do I test my system before or during an event to ensure success?
You can test your system before or during an event to make sure your system meets the requirements to view an event. Click here to test.
Why can't I log in to or register for the event?
If you don't see the login or registration forms for the event, this means that it is not yet time for the event or that access to the event is closed.
How do I dial in to the event?
For events with a telephone listening option, a Listen By Phone option is displayed in the video player. Click Listen By Phone to display the event’s access numbers and passcode. Dial the access number and then enter the passcode. If you dial in early, you will hear hold music until the event starts. The event audio will play through your phone instead of through the video player.
How do I increase the volume of the event?
To turn up the event volume, point to the video player and point to the Volume button at the bottom of the video player. On the volume slider, click and hold the slider button and slide it all the way to the right. If the volume is still too low, turn up your computer volume and speakers.
How do I ask a question?
In the event window, in the Ask A Question tab, enter your question and then click Send. A message displays to let you know your question was sent successfully. Click Close to remove this message.
How do I know if my question has been answered?
To view answered questions, in the Ask A Question tab, click Total Answered Questions. All answered questions will display in the order they were answered.
How do I download the event slides and other files?
In the event window, click the Event Resources tab and then click the name of the file you want to download.
When will the event replay be available?
This presentation's archive will be available for repeat viewing at this same URL one hour after the presentation ends.
Troubleshooting
Why can't I hear the event audio?
If you can't hear the event audio, make sure your speakers are turned on and turned up. If you still don't hear You can also refresh the event window may refresh your player by clicking the double arrows located near your volume slider. If you continue to have trouble, please consult the help tab (?) in the top right for tech support.
Why do I hear background music during the event?
Please ensure that you do not have another instance of the audience player open in the background. You may also want to try refreshing your player by clicking the double arrows located near your volume slider. If you continue to have trouble, please consult the help tab (?) in the top right for System Requirements and troubleshooting information.
Why aren't the slides synchronized with the event audio?
If you are listening by phone, please make sure you have selected the "Listen By Phone" option on your player to ensure proper slide sync. If you are listening through your computer, please refresh your player by clicking the double arrows located in the Media Player in the top left of your screen.
Why can't I see the survey questions?
If you can't see the survey questions, refresh the event window. If you still can't see them, make sure any pop-up blockers on your system accept pop-ups from the event's domain.
Buffering/Lost Audio/Echo
If you lose audio at any time, please refresh your player by clicking the double arrows located near your volume slider. If you continue to have trouble, please consult the help tab (?) in the top right for System Requirements and troubleshooting information.
Video Playback Issue
Please use a wired internet connection to improve connection speed. If you are connected to a VPN, please disconnect as VPNs can reduce your available bandwidth and increase latency, which is especially important when streaming video.
Still having trouble?
Try using another internet browser to access the presentation.