Reports & Recordings
Edit and download event recordings and run event reports.
- Recordings
- Assemble or edit an event recording
- Download the event recording
- Record new video clips using On-Demand/Sim-Live Studio
- Jump Points
- Reports
- What types of reports can I get on my event
- Run event reports
- Third-party analytics data
- What data is included in my reports (Audience Details)?
- Accessing a Calendar of Events
Recordings
Assemble or edit an event recording
Use the editing studio to make simple edits to recorded content and to assemble content for any type of event. You can add and remove audio or video clips, slides, headshots (telephone broadcasts), surveys and survey results, and layout changes if you turned on Layout Switching. You can also change the start and end times of the event, cut out parts of the event audio and video, change the times that content is presented, and add jump points to specific parts of the event.
Notes:
- For detailed edits, we recommend using dedicated video editing software.
- The editing studio goes by different names depending on the type of event: On-Demand Studio for On-Demand events and archived Live events; SimLive Studio for Simulated Live events.
Jump to: Before you begin | Access the editor | Add event content | Edit the recording | Publish the event
Before you begin
The editing studio automatically saves your changes as you edit and keeps a history of those changes while you are editing. The Undo button lets you cancel each change you made, in reverse order (starting with the most recent).
When you close the editor, it ends an editing “session” and all changes are saved (there isn't a Save button). The next time you open the editor, the Undo button is disabled - you can't undo changes from the previous editing session. However, you can reverse out all changes and revert to the last published version - just click Revert Unpublished Changes. Attendees won't see your edits until you click Publish All Changes.
Access the editor
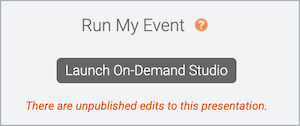
To start editing or assembling an event, on the Event Summary tab, click Launch On-Demand Studio or Launch SimLive Studio. A notice displays if you have unpublished edits to the event.
Add event content
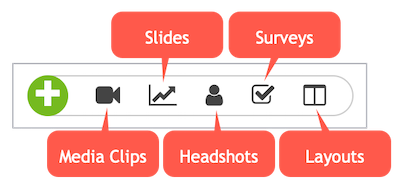
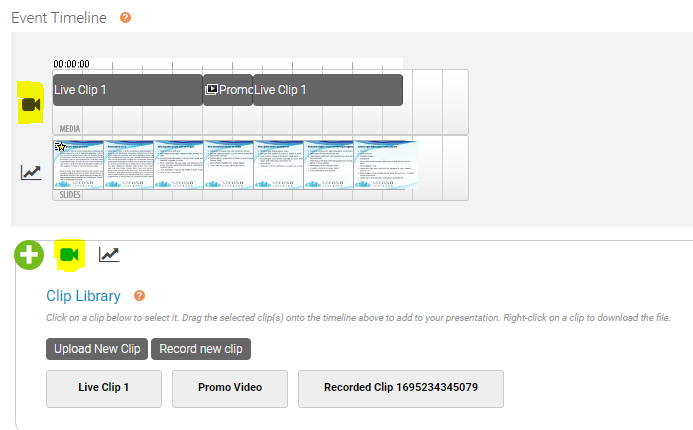
The event timeline is where you'll edit or assemble the event. It contains tracks for all types of event content: the Media track for audio and video clips and overlay videos, the Slides track, the Headshots track (Telephone broadcasts only), the Surveys track, and the Layouts track.
If you are editing an archived Live event recording, the event timeline already contains the audio or video clip, slides, headshots, surveys, and layouts presented during the event. If you're assembling an event from scratch, the event timeline is empty.
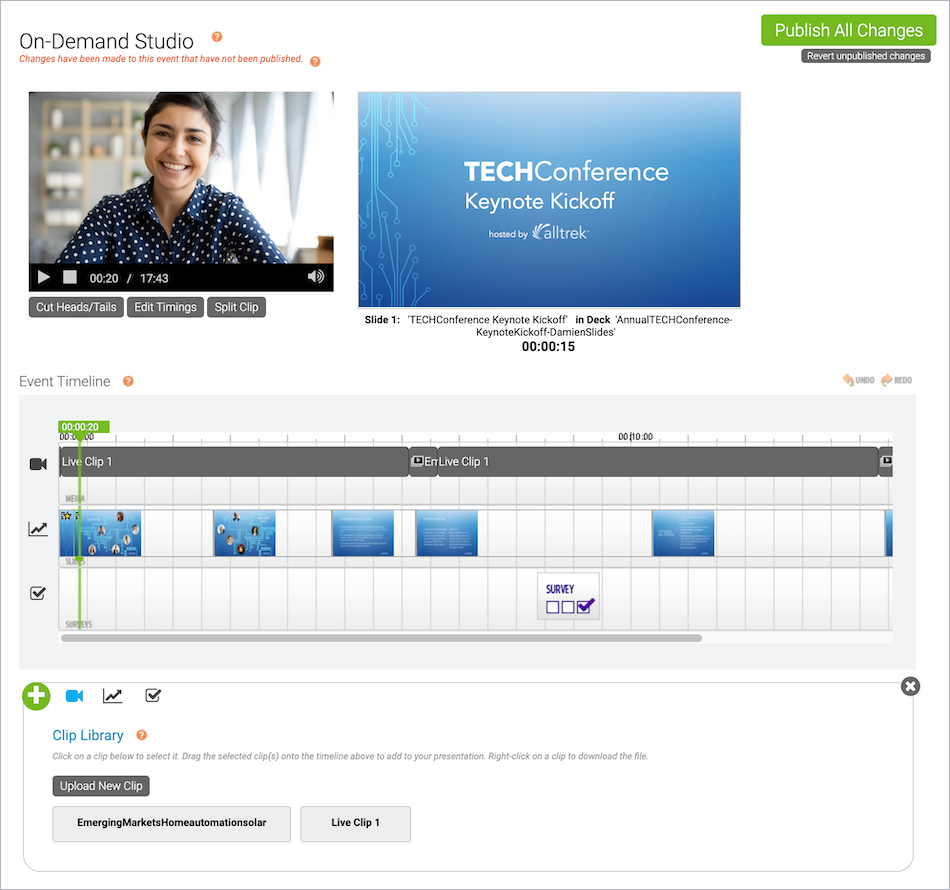
The content you uploaded on the Event Content tab when you set up the event is available in the content libraries. To add content to the recording, under the timeline, click the Media Clips, Slides, Headshots, Surveys, and Layouts buttons to expand the content library and then drag and drop content onto the appropriate track on the timeline. You can also optionally click the Add (+) button to expand the Media Clips library.
Edit the content and timings
After you add content, on the video player, click Play to run through the content on the event timeline and review placement and timing. The clips and headshots on the timeline play in the video player on the left, and the slides and surveys are displayed on the right. After you click Play, you can click and drag the green marker on the event timeline to go to any point in the event.
Then, use the timeline and video player options to adjust individual elements in the recording.
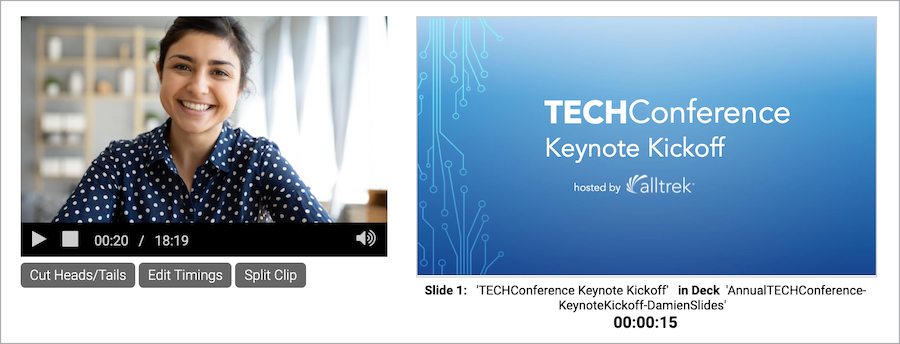
On the event timeline, right-click a:
- Clip to play it, edit the clip duration, replace it with another clip you uploaded to the event, or remove it
- Slide to edit the timings, replace it with another slide you uploaded to the event, remove it, or add or edit slide animations
- Survey to remove it
- Headshot to edit the timings or remove it
Under the video player, click:
- Cut Heads/Tails to change the start and end times of the event
- Edit Timings to add Jump Points to the event
- Split Clip to cut a live or primary clip into two
Note: You can't split overlay videos.
When you're finished editing, a message displays asking you to Adjust Event Timings. Click Yes.
Important: If you click No, the slides and other content may become out of sync with the event audio or video.
Publish the event
Once your edits are complete, be sure to review them. On the video player, click Play to run through the updated timing and content. When you're ready to finalize changes to the event, in the top right corner of the editing studio, click Publish All Changes. Publishing the event updates the event replay and the downloadable MP3 and MP4 archive. You will receive an email once the event is published.

Download the event recording
Download recordings of completed Live, On-Demand, or Simulated Live events from the Webcast Admin portal. You can download the event video as an MP4 file or the event audio only as an M4A (video broadcasts) or MP3 file (telephone broadcasts).
To download the recording, sign in to the Webcast Admin portal and edit the event.
Download the event video
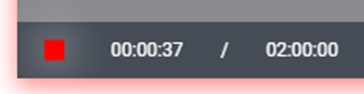
After the Live event or after you publish the On-Demand or Simulated Live event, you can export the event recording. The amount of time the MP4 takes to process depends on the length of the event.
Important: You can't make edits to the event in the editing studio until the recording has finished processing.
To download the recording as an MP4:
- On the Event Summary tab, under Manage Webcast Archive, click Export Webcast as MP4.

- A warning window asks if you're sure you want to export the MP4. Click Yes.
The recording will begin processing. Once the recording is ready, you'll receive an email when the recording is ready to download.
- Under Available Archives, click MP4 created on to save the recording.

You can also download the MP4 from the MP4 Archive Complete notification email. In the email, click Download MP4 or copy and paste the link into a browser.
Note: The recording can be downloaded a total of 10 times. Once the download limit is exceeded, you must download the recording in the Webcast Admin portal.


Download the event audio
To download the recording as an audio file:
On the Event Summary tab, under Available Archives, click Audio only created on to save the recording.

Record new video clips using On-Demand/Sim-Live Studio
For On-Demand and Simulated Live events, you can use the OD/Sim-Live Studio interface to record new video clips. These clips can be easily swapped into a pre-recorded event to replace or supplement the original recording.
At the bottom of the OD Studio, click on the camera icon to open the Clips Library. Available clips will appear here, including recordings from the live event/capture and any video files uploaded to the event. 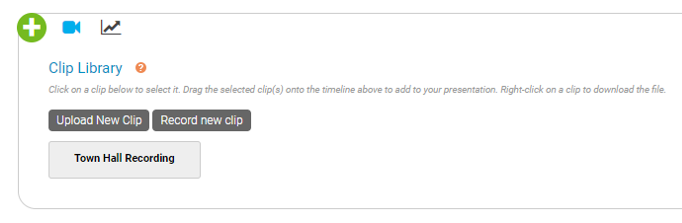
Click Record New Clip to record a clip to be used in the presentation.
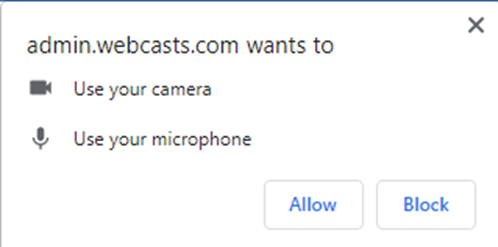
You may be prompted by your browser to allow the recording studio access to your camera and microphone. Click Allow if prompted.
The Video Clip Recorder will load. Click Preview My Camera to load a preview of your camera.
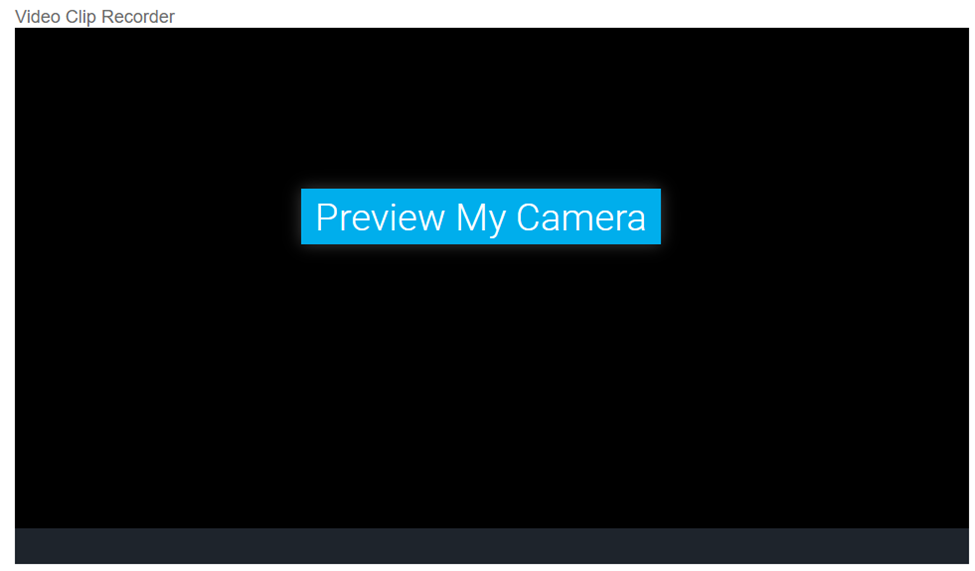
The video window will display a preview using your default camera and microphone sources. Use the Video Input and Audio Input dropdowns below the video window to select a different camera or microphone source.

Click on the green circle icon in the lower left corner of the video window to start a recording. When the recording is complete, click on the red square icon in the lower left to stop the recording.
A playback of the recording will display in the video window once complete. Use the play button in the lower left of the video window to preview the clip you just recorded.
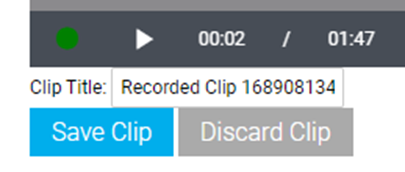
You can update the name in the Clip Title field. If you want to save the recording, click Save Clip. Click Discard Clip if you want to delete the recording. Additional clips can be recorded as required.
Once recordings are saved, they will be available in the Clip Library of the On-Demand Studio. Clips can be dragged from the Clips Library and dropped on the Media Clips track of the Event Timeline. To replace an existing clip with a new recording, right-click on the clip in the Event Timeline and select Replace Clip. Select the new recording from the available list.
Best Practices
To improve recording quality, we recommend the following best practices:
- Use an external webcam and external microphone or headset, rather than a computer's built-in camera and microphone
- Use a wired internet connection
- Disconnect from VPN and/or remote desktop (if applicable)
Jump Points
Overview
Jump Points are timestamps in an On-Demand presentation that viewers can easily navigate to when watching. Jump Points are automatically included for each Slide transition and Overlay Video in a presentation. Jump Points can be enabled for Survey and custom Jump Points can be included as well. Below are instructions on how to view and edit Jump Points (for Admins) and how to access Jump Points while watching (for Viewers).
Setup and Editing
Jump Point setup can be access using the Edit Timings button below the Video/Headshot window at the top of the On-Demand Studio.

In the Edit Timings window, a list of all event timings will display, include Slide transitions and any Surveys or Overlay Videos sent. Jump Points are controlled in the Jump column along the left. A blue arrow indicates a Jump Point is enabled, while a grey arrow indicates a Jump Point will not display to viewers. Jump Points can be toggled on/off using these controls. The name that appears in the Title field is what viewers will see when the access the Jump Points.
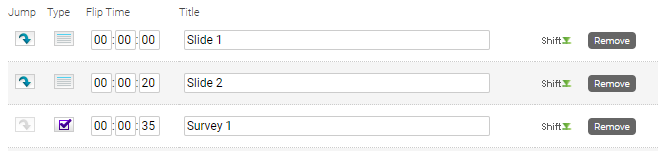
To add a custom Jump Point that is not associated with any existing content, click this button in the top right of the Edit Timings window:

Add the time you would like the Jump Point to appear in the Flip Time field in HH:MM:SS (Hour, Minute, Second) format. Add the name for the Jump Point that viewers will see in the Title field.

Jump Points for all Overlay Videos will be added by default. Use the checkbox at the bottom of the Edit Timings window to remove these Jump Points instead.

Click Save Changes to save any changes to the Edit Timings window.
Viewer Experience
Viewers can access Jump Points by using the button on the lower right of the Video/Headshot window. Hover your cursor over the window to access controls:
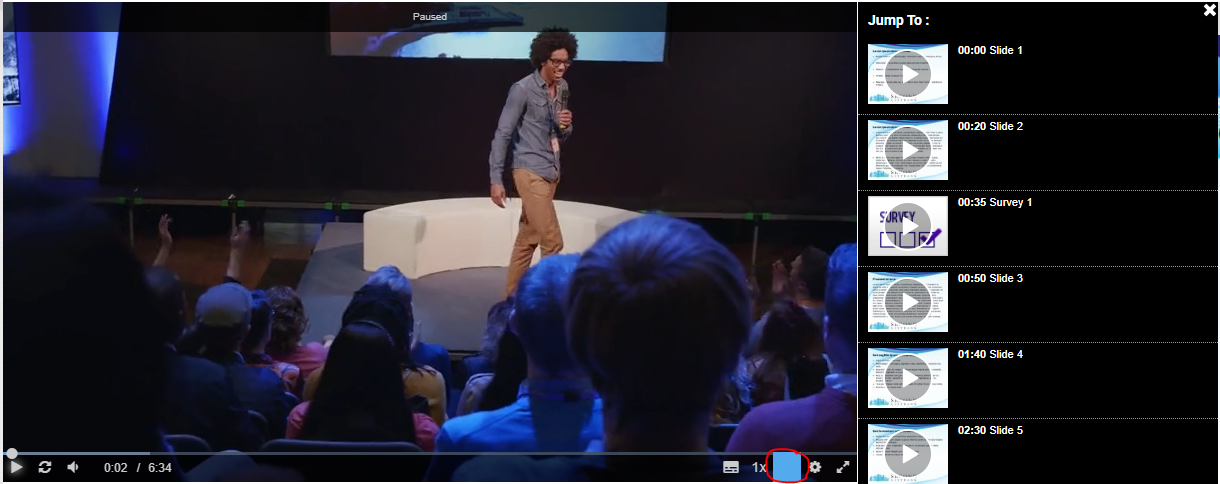
A list of Jump Points will appear to the right of the window. Viewers can click on a Jump Point to skip to that point in the presentation.
Reports
What types of reports can I get on my event
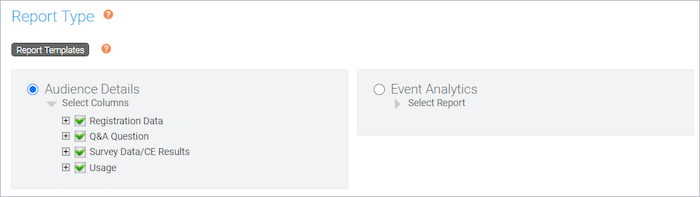
There are two types of reports that you can run on your events: an Audience Details report and an Event Analytics report. For both reports, you can include or exclude many pieces of data.
Audience Details report
Run an Audience Details report for a user-level breakdown of your attendees' interactions. You can include:
- Registration Data for the information attendees submitted during registration including standard and custom registration questions and Campaign Source Tracking IDs.
- Q&A Question for a table of attendee questions and the answers submitted by presenters. Each row represents a unique attendee (questioners are anonymous).
- Survey Data/CE Results for the in-event and post-event survey responses, certification exam results, and the certificate link.
- Usage for the number of registrants, viewing sessions, no shows, duration of views, the referrer, and log-in and log-out times for viewing sessions (session breakouts) for the event and replays.
Event Analytics report
Run an Event Analytics report to view broader, event-level data. You can select:
- Usage for the total number of registrants and total duration of views for the event and replays.
- Campaign Source Tracking Report for the number and percentage of attendees that joined from Campaign URLs
- Locations for the number and percentage of countries attendees joined the event from.
- Click Tracking for the event resources (files and links) download details, including the total number of times and the percentage event resources were downloaded, individual attendee registration information, the files each attendee downloaded, and the date and time the file was downloaded.
- Media Report for the media type, device type, browser, and operating system viewers used to access the event.
- Survey Summary for a list of survey questions, the total number of responses and unique respondents, and the percentage of responses for each survey answer.
- Q&A Summary for the attendee registration information, the questions each attendee submitted, the answer, the answer status, and the date and time the question was submitted.
- CE Details for each viewer's certification exam results by viewer.
- Duration Based CE Details for each viewer's duration-based certification exam results.
- Audio Bridge Call Usage for a summary of presenter and audience member phone numbers, minutes, and locations.
Run event reports
Run detailed reports on your attendees and event analytics for one or more events. You can download reports as XLSX or CSV files, or email them to others. You can access reports at any time and up to a year after the event date. To learn more about report types and the data you can include, see What types of reports can I get on my event?
Note: Live event reporting data is available 30 minutes after the event concludes.
To run a report for one or more events:
- Sign in to the Webcast Admin portal.
- To run a report for a single event, click on an event from the My Events tab, and under the event click Reports. You can also run a report from the Event Summary tab when you edit an event.

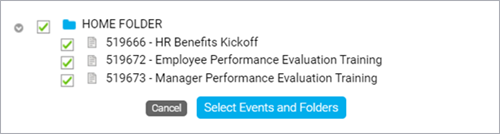
To run a report for more than one event, click the Reports tab at the top of the page. On the Report tab, under Selected Events, click Add Events/Folders.
Select the events and then click Select Events and Folders.

- On the Reports tab, under Report Type, select the report you want to run, click Select Columns, and then select data you'd like to include.

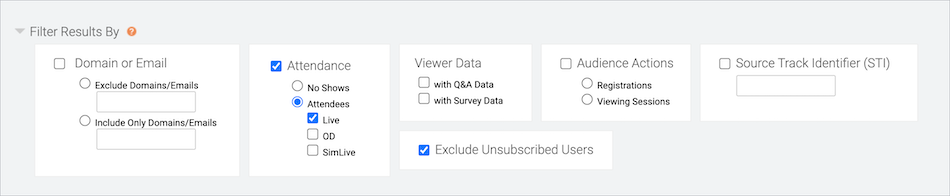
- Optional. Expand the Filter Results by section and select the criteria to filter for.
Tip: If your event registration form includes a marketing consent option, select Exclude Unsubscribed Users to get a current list of registrants who opted in to receive event emails. For more information, see Add marketing consent tracking to a registration form.

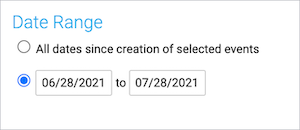
- Optional. Under Date Range, select dates to filter the report data by date.

- Click Run My Report.
The report opens in a new tab on your browser.
- At the top of the report, you can export it as an XLSX or CSV file, or send it to others by email.


Third-party analytics data
After you enable third-party analytics for an event you'll be able to track the pages registrants land on, including the registration page, the event window, and the page registrants see when the Player is set to Closed.
The following table explains the page URLs you might see in your analytics solution.
| URL in analytics | Event page |
|---|---|
| event.jsp | Event window |
| landing.jsp | Event closed page (Player set to closed) |
| starthere.jsp | Registration page |
You can roughly track registration conversions by comparing the number of people who viewed the registration page and the number of people who viewed the event window.
What data is included in my reports (Audience Details)?
The Audience Totals graph will provide a visual breakdown with totals and percentages of registrationsand viewing sessions, which is highlightedby viewing type (Live, On-Demand and/or SimLive). For live events, the Attendance During Live Event graph tracks the attendance throughout the presentation. Click and drag to zoom into specific points in the event. The Event Activity graph tracks registration and viewing sessions since the event was created.

Below will display a list of totals on the event.The Total Sessions is the total number viewing sessions on the event. The Total Registrants is the total number of registrants for the event. The No Shows is the number of registrants that did not login to watch the event. The Total Conversion Rate is the percentage of the Total Unique Registrants, not including No Shows, that logged in to the event. This number will change over time as new users register and view the event archive.

The Live Sessions is the number of viewing sessions on the Live event. The Unique Live Viewers is the number of unique email addresses that viewed the Live event. The Registrants at Live Event Conclusion is the total number of registrants at the time the Live event concluded. The Live Event Conversion Rate is the percentage of Unique Live Viewers compared to the Total Unique Registrants as of the time the Live event ended. Note that this number may be less than the Total Unique Registrants number shown in the report as that one continues to increase as new users register for the event archive.

The On-Demand Sessions is the number of viewing sessions on the On-Demand or Archived event. The Unique On-Demand Viewers is the number of unique email addresses that viewed the On-Demand or Archived event. The Sim Live Sessions is the number of viewing sessions on the Simulated Live event. The Unique Sim Live Viewers is the number of unique email addresses that viewed the Simulated Live event.

Individual viewer data is broken down at the bottom. This will include registration data, viewing sessions and times, survey responses and Q&A for each registered email address.

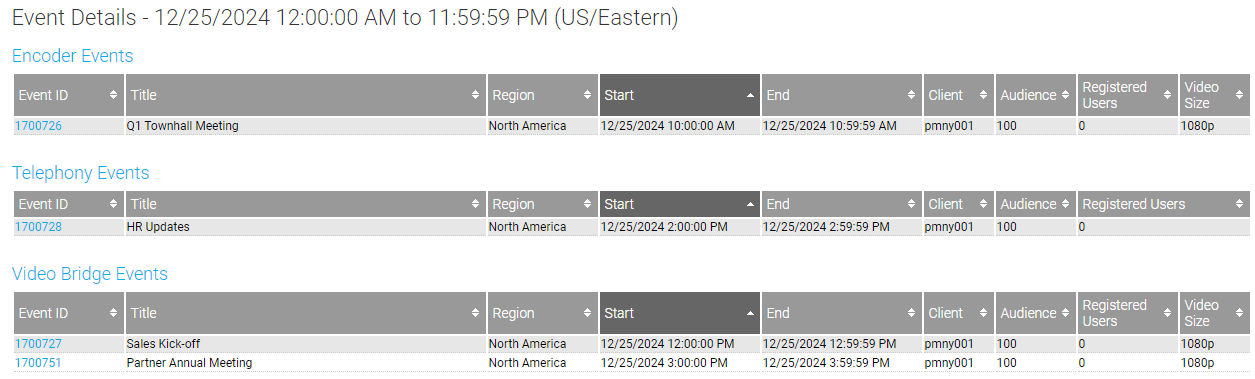
Accessing a Calendar of Events
The Webcast platform allows easy access to a calendar of events to help keep your team organized. The calendar allows you to view a list of Live and Simulated Live events, along with additional event details, sorted by date.
To access the calendar of events, click on the Calendar link in the top right of the Webcast platform.

This will launch a monthly calendar view, with the number of events (organized by event type) listed under each day. Click on a day to open a list of scheduled events.
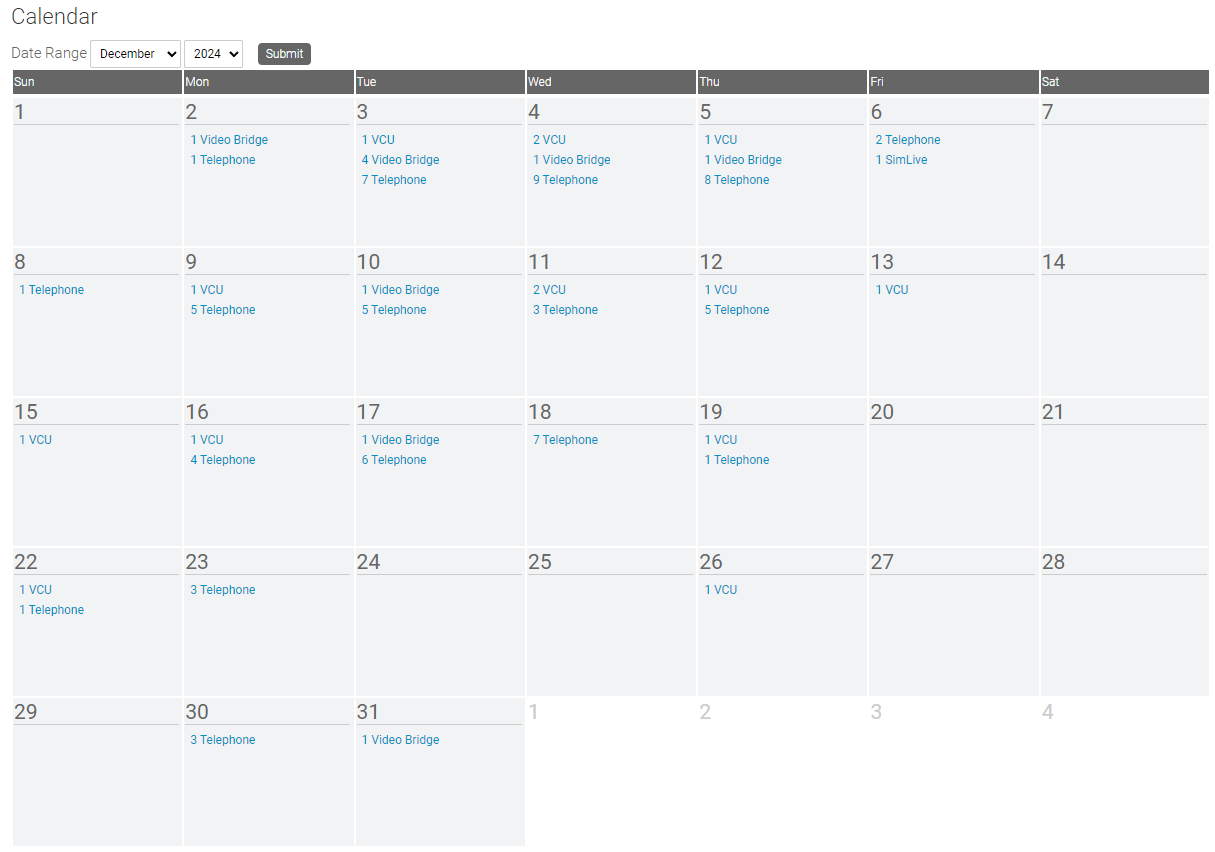
The day view of the calendar will show the events broken down by event type, along with helpful details on the event. Click on the Event ID in the left column to access the event.