# Live Events
# Ways to broadcast a Live event
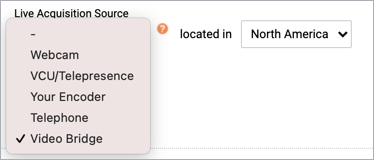
We offer multiple ways to broadcast no matter the scale of your event, the venue, or the location of your presenters. When you schedule a Live event, you select how presenters will connect their audio and video to broadcast to the audience. The device or method is the *live acquisition source* for the event.
**Note:** This only determines how your presenters connect their audio and video and broadcast to the audience. All webcast events include visual elements such as headshots, slides, overlay videos, and more.
If presenters will speak to the audience but remain off-camera, select Telephone as the acquisition source. If they'll broadcast audio and video, you can use a single webcam, the video bridge for multiple webcams, an encoder, or a video conferencing unit (VCU).
Available options depend on your account settings. Contact your sales representative or Support to request additional broadcasting options.
[](https://helpgm.webcasts.com/uploads/images/gallery/2022-05/swXoRLxwt9Ol1lAr-liveacquisitionsources-cropped.jpeg)
# Broadcast audio only
Select **Telephone** to broadcast the presenter audio with a telephone connection. Up to 20 presenters can stream their audio from a telephone or VoIP connection. Presenters dial in to the presenter bridge and a backup bridge is included as a backup audio source.
# Broadcast audio and video
There are several options for connecting presenters and streaming their audio and video to the audience. They can connect directly using their own webcams or connect to another system or service first and then stream that source into the event.
- **Webcam** - A single webcam connection. Broadcast one presenter or several presenters using the same webcam. Before the event, you must install a driver on the computer you plan to use on the day of the event that lets the event connect to your webcam. Recommended if the event has only one presenter or one webcam source.
- **Video Bridge** - For multiple presenter video streams. Allow up to 20 presenters to connect their webcams and broadcast.
- **Advanced Video Bridge** - Allow presenters to broadcast from a video conferencing system, Skype for Business, or telephone audio.
- **VCU (Video Conferencing Unit)** - Recommended for conference rooms. Use your own video conferencing unit to provide the video feed for the presentation. Before the event, get the H.323 or SIP address for the VCU and ensure it accepts incoming connections. In the Live Studio, the advanced video bridge uses the address to call out to the VCU and bring it into the event.
- **Your Encoder** - Use your own RTMP-enabled encoding device to broadcast multiple webcams and microphones from your venue as a single stream.
# Join the Live Studio
To moderate or present at a live event, enter the Live Studio and connect your audio or video. The Live Studio has controls for presenting slides, playing videos and other content, managing Q&A, and more.
The way you join the Live Studio depends on whether you have a webcasting account or whether you were invited to be a presenter or assist with Q&A.
# Join as a moderator
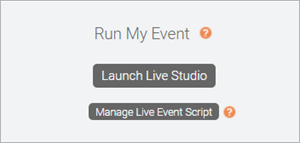
If you have a webcasting account, sign in to the Webcast Admin portal and in the My Events list, click **Edit** to open the Live event. On the Event Summary tab, under Run My Event, click **Launch Live Studio**.
[](https://helpgm.webcasts.com/uploads/images/gallery/2022-05/uVXZtVdqc7PthBjw-webcastadminportal-runmyevent.jpeg)
# Join as a presenter
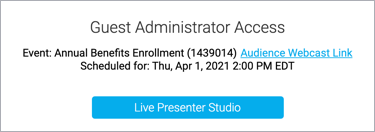
If you were invited to present at the event, you should have received an email with login details and a link to the Guest Admin Access site. Click the link and enter your information or credentials to sign in, and then click **Live Presenter Studio**.
[](https://helpgm.webcasts.com/uploads/images/gallery/2022-05/GtqD3fh09aAiTyLa-guestadminsite-livestudio-cropped.jpeg)
# Join as a Q&A manager
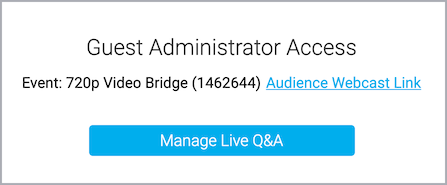
If you were invited to manage audience questions at the event, you should have received an email with login details and a link to the Guest Admin Access site. Click the link and enter your information or credentials to sign in, and then click **Manage Live Q&A**.
[](https://helpgm.webcasts.com/uploads/images/gallery/2022-05/UyqrUA9NXRhkzSHP-guest-admin-login-for-qa.jpeg)
# Add a virtual background to your Webcam event
The Webcast service does not currently offer virtual backgrounds for Webcam acquisition events. However, you can add them to your video stream with a third-party virtual webcam app. A virtual webcam app is software that allows you to add virtual backgrounds, filters, and more to your webcam video. After you install it, the virtual webcam displays as a new webcam source that you can select when joining the event.
**Note:** Virtual background are available for Video Bridge events. Refer to this help article for more information: [https://helpgm.webcasts.com/books/live-events/page/adding-virtual-backgrounds-on-the-video-bridge.](https://helpgm.webcasts.com/books/live-events/page/adding-virtual-backgrounds-on-the-video-bridge)
Supported virtual webcam apps include:
- [CamTwist](http://camtwiststudio.com/)
- [Chromacam](https://www.chromacam.me/)
- [Manycam](https://manycam.com/)
- [OBS](https://obsproject.com/) with Virtual Camera
- [Snap Camera](https://snapcamera.snapchat.com/)
- [Xsplit VCam](https://www.xsplit.com/vcam)
**Note:** Download and test the app in the Live Studio at least 48 hours before the event starts. We do not provide support for third-party applications.
# Change your background with a virtual webcam
Before joining the Live event, start the virtual webcam app and set up your virtual background.
**Important:** You must keep the virtual webcam running during the event for your virtual webcam to display properly.
**To connect to the event with a virtual webcam:**
1. [Join the Live Studio](https://helpgm.webcasts.com/books/live-events/page/join-the-live-studio).
2. In the Live Studio, a notification displays in the top left of the window that requires you to allow the Live Studio to access your computer's camera and microphone. Click **Allow** to grant permission. [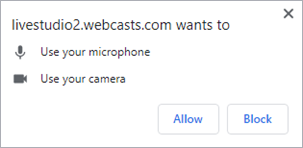](https://helpgm.webcasts.com/uploads/images/gallery/2022-05/eaFlk3f7CMEf9sr7-livestudio-chrome-allowcameramicnotification.png)
3. In the Broadcast Controls panel, click **Preview**.
4. For your Video source, select your virtual webcam and then select the microphone you want to use for the broadcast. Check your webcam preview and audio levels to verify that they work properly **Note:** This is only a preview. Your webcam is not visible to the audience or other presenters.
[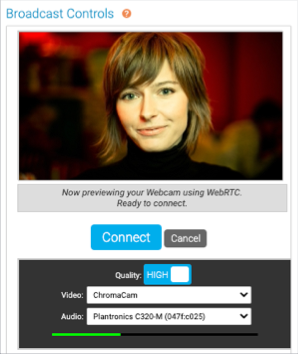](https://helpgm.webcasts.com/uploads/images/gallery/2022-05/aghhopzVAvslPOOz-livestudio-webcampreview-virtualwebcam-louisa.png)
5. Click **Connect** to connect your audio and video to the event. Once you're connected, other presenters can see your webcam. **Note:** The connection can take up to two minutes to establish. If your stream fails to connect, click **Cancel** and then preview and connect it again.
# Add live interpretation with Interprefy
Extend your event’s global reach by pairing your webcast with Interprefy's interpretation widget. Interprefy allows multi-language support by providing viewers with real-time interpretation in multiple languages. The audio interpretation widget can be added to Live audio-only or video webcasts.
**Note:** Webcasts support audio interpretation services only. Video interpretation services are not supported.
# Schedule your Interprefy event
Before your event, you must reach out to Interprefy directly to schedule an interpreter and receive an Interprefy widget link.
Your Interprefy widget link should look like this: [https://interpret.world/login=widgetdemo](https://interpret.world/login=widgetdemo)
For managed events, you must provide the event production manager with the Interprefy widget link at least 72 hours before the event start time.
# Example code
Use the following sample code to embed the Interprefy widget. Replace **https://interpret.world/login=widgetdemo with your Interprefy widget link.
```HTML
```
# Add the Interprefy widget
Once you have received your link from Interprefy, the widget can be embedded into the webcast player. Sign in to the Webcast Admin portal and edit the Live event to add it.
**To add interpretation to an event:**
1. On the left panel, click the **Event Content** tab.
2. Under Optional Content, expand the **Add Custom Player Tabs** section and click **Add Primary Tab**.
3. Enter a name for the live interpretation tab.
4. At the right side of the text editor, click **</>** to switch to code view.
5. Delete all the placeholder code.
6. Copy the example code and paste it in the editor.
7. Replace **https://interpret.world/login=widgetdemo** with your Interprefy widget link for the event. **Note:** Your Interprefy link must begin with **https://** and contain either of the following expected domains: interprefy.interpret.world, interpret.world.
[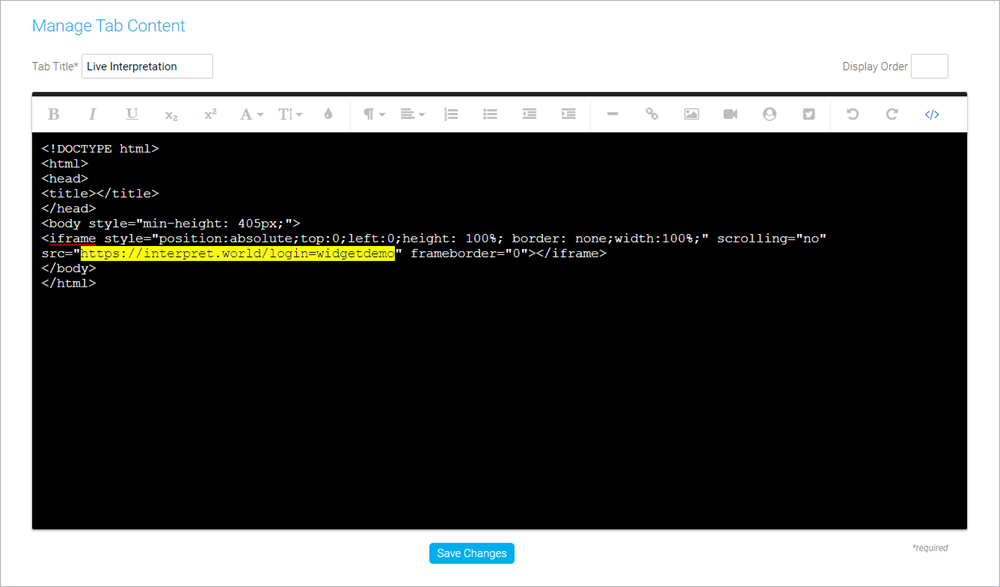](https://helpgm.webcasts.com/uploads/images/gallery/2022-05/smbsWITTktT0bCi6-webcastadminportal-managetabcontent-liveinterpretation.png)
8. Click **Save Changes** to save the coding. Then click **Save and Continue** to save changes to the event content.
# Preview the widget
You should always preview the tab setup before the Live event.
**To test Interprefy for your event:**
1. In the Webcast Admin portal, edit the event.
2. On the Event Content tab, edit the sidebar tab you created for captioning and replace your Interprefy widget link with **https://interpret.world/login=widgetdemo**.
3. Click **Save Changes** to save the coding. Then click **Save and Continue** to save changes to the event content.
4. Now, preview the widget in the web player. On the **Event Summary** tab and at the top of the page, click **View Event**.
5. In the web player, click the interpretation tab and select a language. The interpretation starts automatically. [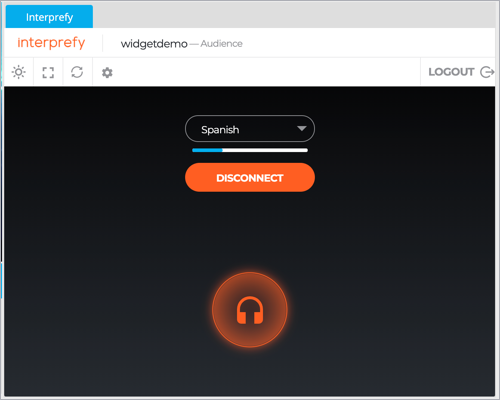](https://helpgm.webcasts.com/uploads/images/gallery/2022-05/4MZN1fCDCSvFArMh-eventwindow-interprefytab-cropped.png)
Once you've tested Interprefy, go back and update the primary tab coding with your widget link for the event.