Video Bridge Updates - Coming Soon!
These articles will cover changes coming to the Video Bridge on September 8th or a subsequent release.
- Video Bridge Overview (Moderators)
- Video Bridge Guide for Presenters and Guest Admins
- How do I connect and broadcast using the Video Bridge?
- Adding Virtual Backgrounds on the Video Bridge
- About Presenter Webcam Layouts on the Video Bridge
- Change the Presenter Webcam Layout on the Video Bridge
- Spotlight Presenter Webcams on the Video Bridge
- Hiding Presenters from Appearing on the Video Bridge
- Screen Sharing on the Video Bridge
- Video Bridge Mini-View
- Help Video - Video Bridge Training for Administrators/Hosts
- Help Video - Video Bridge Training for Guest Presenters
- Help Video - Video Bridge Testing
- Video Bridge Presenter Management Best Practices
- Video Bridge Control Room Settings
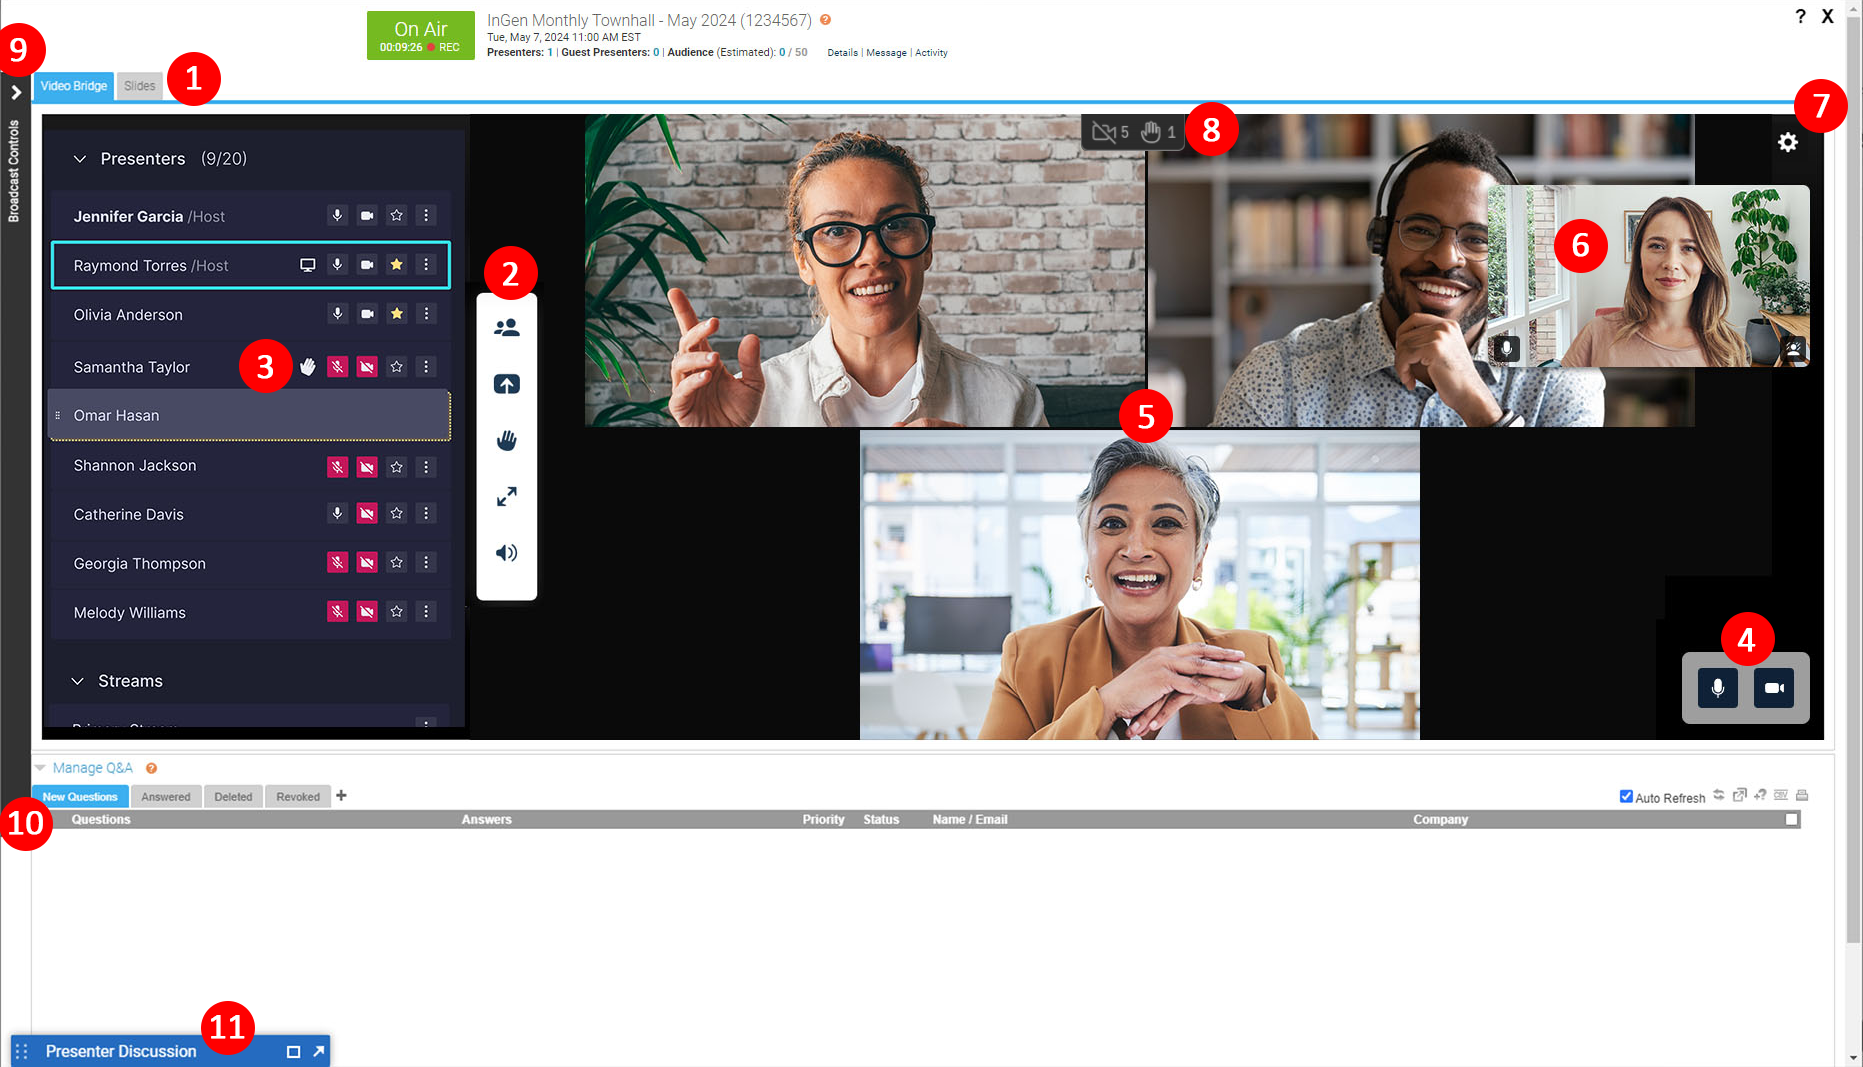
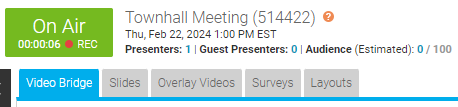
Video Bridge Overview (Moderators)
| Number |
Feature |
Description |
||||||||||||||||||
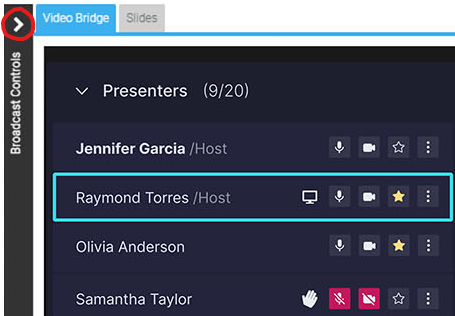
| 1 | Live Studio Tabs |
Controls for different aspects of the event are grouped into tabs. Click the Video Bridge tab to manage your own webcam and audio, select a layout, and to manage presenter webcams and audio. Controls for Slides, Surveys, Overlay Videos, and other content you uploaded to the event are displayed in their own tabs next to the Video Bridge tab. |
||||||||||||||||||
| 2 |
Video Bridge Controls |
Select from the available options to access controls:
|
||||||||||||||||||
| 3 | Presenter Options |
Next to each presenter connection, you may see the following icons:
Below the Presenter list, after the streams for the Video Bridge have been connected in the Broadcast Controls, you will see a Primary Stream and Backup Stream listed. Click on the settings button next to a stream to access additional controls.
|
||||||||||||||||||
| 4 | Local Presenter Controls |
Presenters can use the available options to control their connection to the Video Bridge. Available options:
|
||||||||||||||||||
| 5 | Active Speaker(s) |
The webcam of the presenter(s) will appear here. The number of speaker and layout of be determined by the layout selected by the Administrator. For more details on adjusting the layout of the Video Bridge, review this article: About Presenter Layouts Voice-activated camera switching is used to highlight the webcam of the presenter who is speaking (and recent speakers when using multiple frame layouts). To choose whose webcams are on stage, review this article: Spotlight Presenter Webcams on the Video Bridge |
||||||||||||||||||
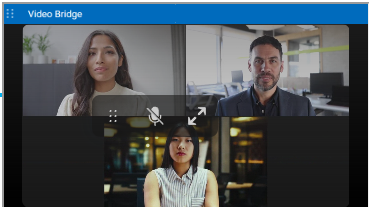
| 6 | Your Camera View | A live view of your webcam. Hover over the window to access a button in the top right of the window to hide your self-view. Click and drag this window to another location on the Video Bridge to change where it appears locally. | ||||||||||||||||||
| 7 | Advanced Settings |
Click on the gear icon to access the advanced settings menu. Available options:
|
||||||||||||||||||
| 8 | Bridge Indicators | Small indicators display at the top center of the Video Bridge view in Live Studio to show important details about your presenters. These indicators are not broadcast to your audience.
|
||||||||||||||||||
| 9 | Broadcast Controls |
Controls to connect the Video Bridge and start/end the event. Access the Broadcast Controls using the > icon access the options to manage the event. For instructions on connecting a Video Bridge and starting/ending the event, review this article: How do I broadcast using the Video Bridge? |
||||||||||||||||||
| 10 | Manage Q&A |
Use the Manage Q&A section to manage the Q&A on the event. For additional information on Q&A, review this article: About Q&A |
||||||||||||||||||
| 11 | Presenter Discussion | Use the Presenter Discussion to have a private chat with presenters before and during the event. |


Video Bridge Guide for Presenters and Guest Admins
A Video Bridge allows presenters to connect to an event and broadcast from different camera sources and locations. As a presenter, you will join the event from your computer and connect the video source that you'll use to speak to the audience. Often this is a webcam, but you can also broadcast and present from a video conferencing system, Skype for Business, or a telephone (where you're not on camera).
Use this guide to learn how to test your system and connect to the Video Bridge. This guide contains the following topics:
- System Requirements
- Test your System
- Connect to the Video Bridge
- Connect using Another Source
- Navigate the Video Bridge
System Requirements
All presenters and venues must meet the following minimum system requirements:
- Operating system - Windows 11, Windows 10, Windows 8.1+ Pro, macOS 10.14+
- Processor - Intel Core i5 3.0GHz or equivalent
- RAM - 4GB
- Internet connection - A dedicated and hardwired high-speed connection of 1.5 Mbps+ (upload and download). We do not recommend using a Wi-Fi connection since it is prone to dips in bandwidth that can negatively impact your video connection.
- Internet Browser - Chrome (latest version), Firefox (latest version), Microsoft Edge (latest version)
Note: Firefox does not support screensharing. - Webcam - High quality or HD webcast (for example, Logitech C920)
- Microphone - Headset microphone or webcam mic with built-in noise-cancelling
Note: If you are using a microphone, use headphones or earbuds to prevent feedback from your computer speakers.
Before the event, presenters and venues must also:
- Plug in their computers. Do not run an event on battery power.
- Disconnect from the VPN.
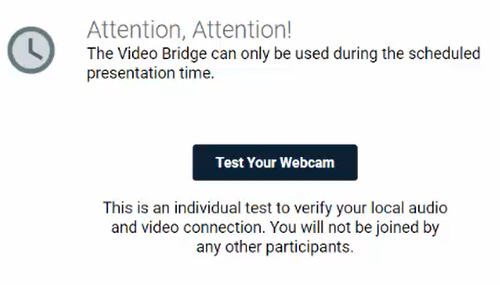
Test your System Before the Event Starts
It's important that you make sure your system is compatible before the event begins to identify and resolve any issues. At least 48 hours before the event, join the Live Studio and run a diagnostic on your system with the network and equipment you plan to use on the day of the event. This checks the quality of your audio and video connections.
You should have received an email with login details and a link to the Guest Admin or Guest Presenter Access site. The Guest Admin site includes a button that lets you enter the Live Studio.
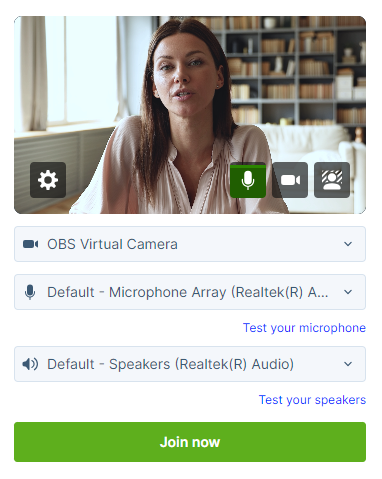
To test your webcam and microphone:
- Sign in to the Guest Admin site and click Live Presenter Studio.
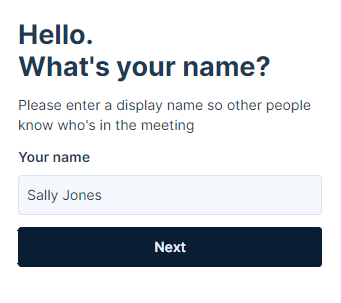
- In the Live Studio, click Test your webcam.

- Enter your name and click Next.

- Select the Microphone, Camera, and Audio Output sources you will use during the event. Confirm that the microphone volume level and webcam preview work properly. Click Test your speakers to make sure you can hear the event audio during the event.

- Click Join now and follow the guided connection test instructions.
The test records a short clip of your audio and video and plays it back to you. Make sure the video plays clearly, without feedback or echo. If it does not record correctly, there could be a network connection issue. Check that you have a wired (LAN) connection to the internet and that it is active.
If you have any issues, run the test again. If you continue to have issues, contact support or your event host.
Connect to the Video Bridge
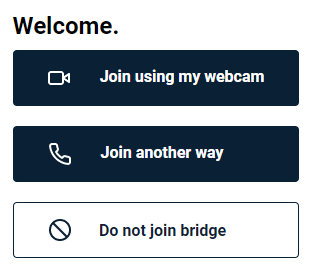
To join the Video Bridge:
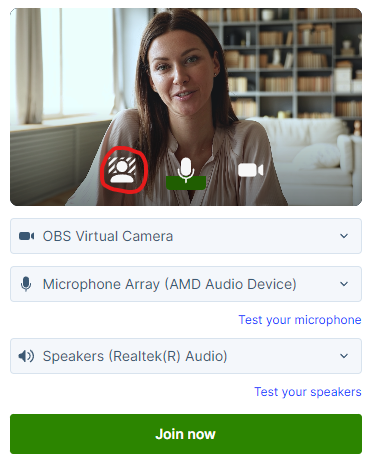
- Sign in to the Guest Admin site and click Live Presenter Studio.
- Click Join using my webcam.

- Enter your name and click Next.

- Select the Microphone, Camera, and Audio Output sources you want to use for the broadcast using the available dropdowns. Confirm that webcam preview work properly and that your microphone audio is being registered on the microphone icon in the webcam preview window. Click Test your speakers to make sure you can hear the event audio during the event.

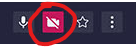
If you are a technical assistant or moderator who will not speak or appear on camera, use the microphone icon or camera icon in the lower right of the video preview to mute your microphone or turn off your webcam.

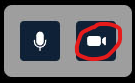
- In the lower right of the video preview, click on the person icon to add a blurred or virtual background to your video stream.

-
Click Join now.
Note: The Video Bridge utilizes UDP/TCP RTP Media Traffic over ports 4000-5000 to connect a webcam. If a presenter’s connection to the Video Bridge is blocked by their network, the system will automatically failover to use TCP 443 (HTTPS).
This failover is intended for presenters behind on a restricted network to ensure a connection can be made. However, TCP media is often subject to a noticeable delay and synchronization issues between audio and motion, as well as a delay on content share streams. It's always better to use a UDP/RTP connection whenever possible. For that reason, it is recommended that presenters disconnect from VPN before presenting. It is also recommended to test your system in advance to ensure there aren’t any issues connecting on the live event.


Connect to the Video Bridge using Another Source
If you are not able to connect to the Video Bridge, are experiencing issues with your audio/video stream on the Video Bridge due to a connection or network issue, or prefer to join from another source, the Video Bridge has additional connection options.
To join the Video Bridge:
- Sign in to the Guest Admin site and click Live Presenter Studio.
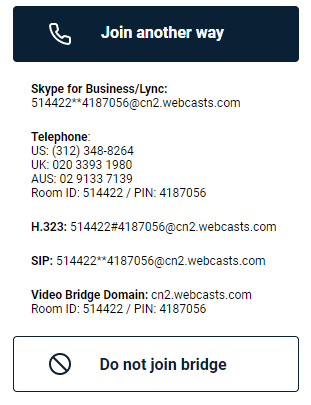
- Click Join another way.

- You will options to connect via Telephone, Skype for Business/Lync, or Video Conferencing Unit using H.323, SIP or a video Bridge Domain. Follow the instructions listed below to connect.
Navigate the Video Bridge
Live Studio Layout
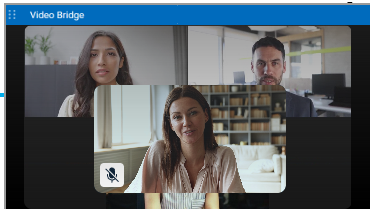
Once connected to the Video Bridge, presenters will be able to see and communicate with other presenters on the Video Bridge. In addition to the Video Bridge, you may see tabs along the top of the Live Studio that provide access to Slides, Overlay Videos, Surveys and other content on your event. Please confirm with the Event Host your responsibilities during the presentation.
Once the event begins, you'll see "On Air" at the top of the window to confirm you are live to viewers. You can now speak, advance slides and use other controls for the event.
Video Bridge Controls
At the lower right of the Video Bridge window, each presenter has buttons to control their connection:
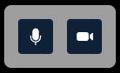
- Click on the microphone button to mute your audio.
- Click on the camera icon to hide your camera from displaying to viewers. These local controls can be toggled on/off during the event as needed.
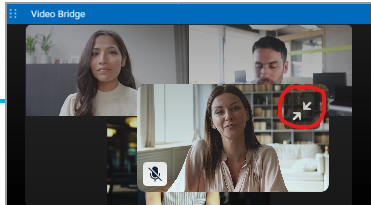
Along the left side of the Video Bridge window, use the menu to access additional controls:
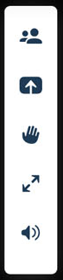
- Click on the people to access the Presenter List.
- Click on the up arrow icon to share your screen. Additionally details on screen sharing are included below.
- Click on the hand icon to raise your hand if you'd like to notify the event moderator or other speakers of your desire to talk.
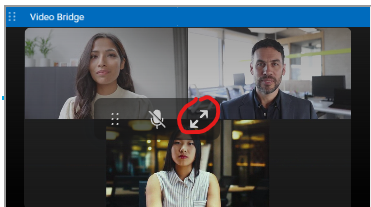
- Click on the double arrow icon to launch the Video Bridge in full-screen view. Press Esc on your keyboard to exit full-screen view.
- Click on the speaker icon to mute the audio from Video Bridge.
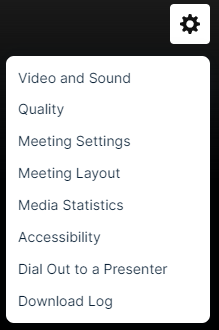
Click on the gear icon in the top right to access advanced settings:
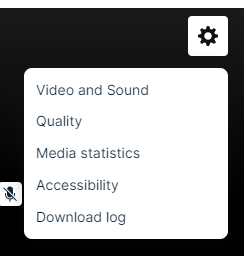
- Select Video and Sound to access controls to select or change your camera, microphone and audio playback sources. Enable "Voice Focused Noise Suppression" to suppress background noise on your connection. Enable "Prioritize Sharing Video" to prioritize motion over sharpness when sharing content with other participants. This is the best option when sharing video through screenshare as the motion will be smoother. When sharing static presentations or images, leave the option disabled to prioritize sharpness. Click Save to apply any changes to these settings.
- Select Quality to adjust your connection quality. This setting impacts the amount of bandwidth required by the presenter. It is set to Auto by default, so the quality will automatically adjust based on a presenter's connection, but it can be manually adjusted using the dropdown here.
- Select Media Statistics to see statistics on your connection. This will allow you to see the overall connection quality, along with details like packet transmission, packet loss and jitter. It is helpful to review these statistics if a presenter is having issues with their connection.
- Select Accessibility to always display Video Bridge controls. By default, controls will fade away after a few seconds of inactivity, but this setting will keep the controls displayed at all times.
- Select Download Log to download a log with details on your connection to the Video Bridge. If a presenter encounters issues with their Video Bridge connection, it's recommended to download the log here before exiting the Live Studio. The Video Bridge log will be helpful to investigate any issues encountered.
Bridge Indicators
Small indicators display at the top center of the Video Bridge view in Live Studio to show important details about your presenters. These indicators are not broadcast to your audience.
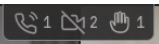
- Presenter count: Total number of presenters when there are more than can be shown in the current layout
- Phone participants: Number of presenters connected by phone
- Muted cameras: Number of presenters with video off
- Raised hands: Number of presenters with a raised hand
Screensharing
When sharing your screen, a pop-up window will appear allowing you to select what content you want to share. Select one of the tabs along the top: a Chrome Tab, Window (or application), or your Entire Screen.

Under the selected tab, choose one of the available options and click Share to make your screen share active to viewers.

Note: When sharing your Entire Screen or a Chrome Tab, use the "Also share system audio" toggle share your computer's audio along with your screen.
Once active, viewers will see the selected screen share application, a small window in the top right with the camera for the presenter sharing their screen, and a shared audio feed from the video bridge. Presenters should minimize their Live Studio and begin their screen share. Once complete, click Stop Sharing to end the screen share.

How do I connect and broadcast using the Video Bridge?
Once presenters have joined the Video Bridge and you are ready to start your event, use the Broadcast Controls section to connect and start your event. In the top left of the Live Studio, click on the > icon next to the Broadcast Controls text to access the controls.
Click on the green arrow icons next to the Primary Stream and Backup Stream to connect the Video Bridge for delivery.
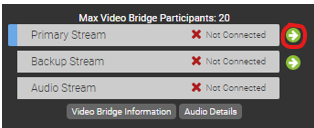
You will see Connected text to confirm when the Video Bridge has been connected. Click Preview Stream to preview the Video Bridge and prepare to start your event.
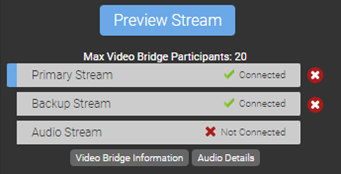
A preview of the Video Bridge stream will load in the Broadcast Controls window above. You will also see the status indicator set to Stand By at the top of the Live Studio, which indicates you are connected and ready to go live.
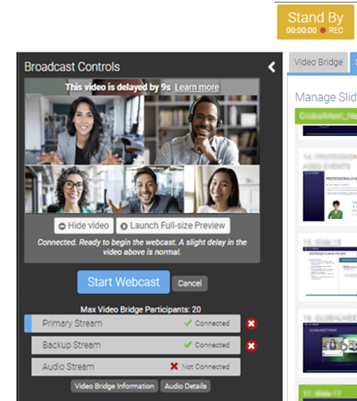
Click Start Webcast to go live to your audience. The status indicator will update to On Air and the timer below will display how long you have been live to viewers.
Once the event concludes, click End Webcast below the Broadcast Controls window to end the presentation.
Adding Virtual Backgrounds on the Video Bridge
Virtual and blurred background are available to presenters connecting their webcam to the Video Bridge. Virtual backgrounds can be added before joining the Video Bridge or after connected to the Video Bridge. Follow the instructions below to include a virtual background on your video: This article also includes best practices for virtual backgrounds.
Adding a Background Before Joining the Video Bridge
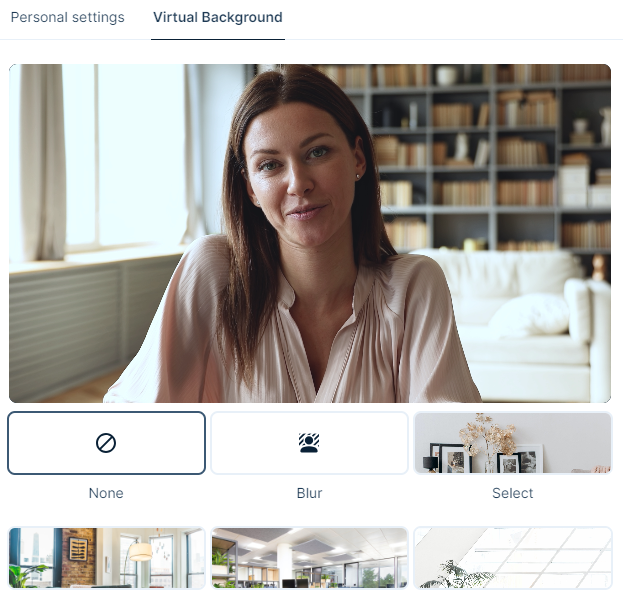
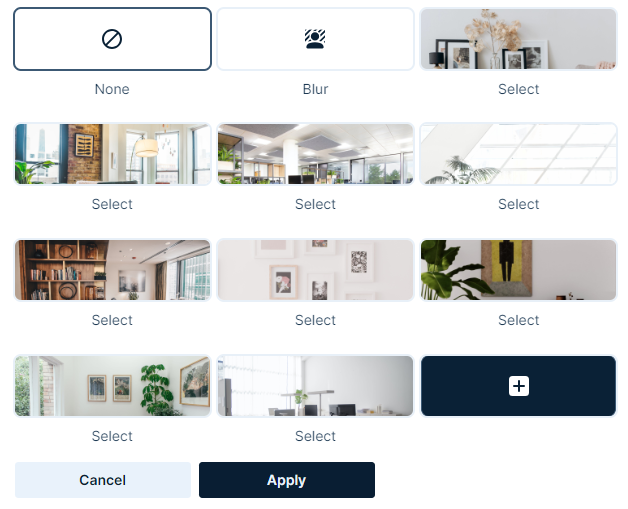
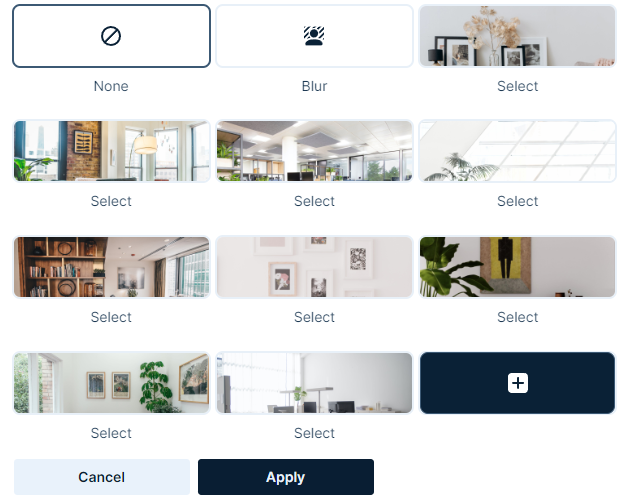
Before you join the Video Bridge, a virtual background can be selected. Along the bottom of the video preview, click on the person icon to add a blurred or virtual background to your video stream.
In the pop-up window, you will see a preview of your video stream and a list of available options below. Select:
- None to use your existing background.
- Blur to use a blurred background.
- One of the available virtual background images.
- The + icon to upload an image to be used as a custom virtual background.
Click Apply to add the selected background to your video stream. Click Cancel to discard changes and use your current background.
Changing Backgrounds When Connected to the Video Bridge
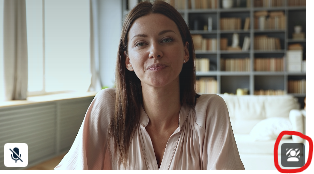
After you join the Video Bridge, you will be able to manage your background at any time throughout the event. In the self-preview window in the top right of the Video Bridge, click on the person icon to add a blurred or virtual background to your video stream.
In the pop-up window, you will see a preview of your video stream and a list of available options below. Select:
- None to use your existing background.
- Blur to use a blurred background.
- One of the available virtual background images.
- The + icon to upload an image to be used as a custom virtual background.

Click Apply to add the selected background to your video stream. Click Cancel to discard changes and use your current background.
Virtual Background Best Practices
Virtual Backgrounds require significant local processing, which could affect the performance of your machine. If there are noticeable audio or video quality issues while using Video Bridge, try disabling the Virtual Background effect. Below are best practices for using virtual backgrounds. Following these guidelines will produce the best quality video:
Setup
- Use good lighting to ensure you and your background are clear and well lit.
- Use a solid-colored background (screen, wall or curtain) or simple background (no art, shelves or objects).
- If available, use a green screen or blue screen for the best results.
- Wear clothing that contrasts with your background. High contrast will make it easier to distinguish you and from your background.
- Use a wired ethernet connection (rather than wifi) for the fastest and most stable connection.
- Restart your computer before the event and close any unneeded programs and applications to optimize your computer's performance.
Video Bridge Layouts
- Using a virtual background will decrease the presenter's video resolution to maintain smooth frame rates across varying types of connections.
- When displayed full screen for high resolution events (720p+), you may see an impact to the quality of their video quality. If so, it is recommended to display these presenters in a multi-camera layout for the best results.
Custom Background Images
For custom virtual background images, we recommend images using the following minimum specs:
- Resolution: 1920x1080
- File Type: JPG
- File Size: 1 MB
Troubleshooting
If the virtual background option does not appear, this is may due to a browser setting. Please enable your browser's hardware acceleration, which allows for smoother browsing, audio/video streaming, and overall experience.
- For Chrome: Visit Menu > Settings > System and ensure the Use graphic acceleration when available is enabled. Restart your browser and rejoin the Live Studio.
- For Edge: Visit Menu > Settings > System and performance and ensure the Use graphic acceleration when available is enabled. Restart your browser and rejoin the Live Studio.
About Presenter Webcam Layouts on the Video Bridge
On the video bridge, you can choose how you want to arrange presenter webcams and which presenters to display to the audience during the Live event. This article introduces instructions on how to access Layout, the available Layout options, and details on how to spotlight an individual presenter and how you hide presenters from appearing to the audience.
Important: To see the video bridge and interact with other presenters, you must join with a webcam. Presenters who select I will not be appearing on camera won't be able to see or hear presenters who have joined the video bridge.
This guide contains the following topics:
- Presenter Webcam Layouts
- How the Video Bridge Fills the Stage
- Voice-Activated Camera Switching
- Prioritizing Presenters on Stage
- Hiding Presenters on Stage
Presenter Webcam Layouts
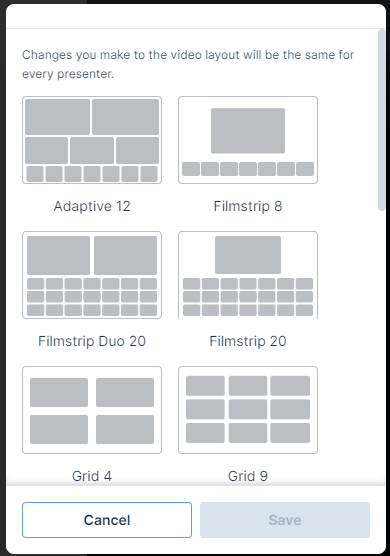
Presenter webcam layouts control the number of presenters on stage and how their webcams are arranged. By default, the event shows one presenter - Individual layout. You can change this layout before the event begins and at any time during the Live event. To access Layouts, click on the gear icon in the top right of the Video Bridge and select the Meeting Layout text.

Select from the available layouts by clicking on the thumbnail.

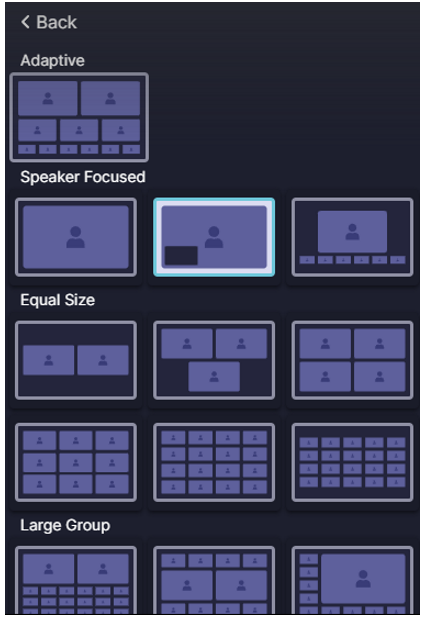
Layout options include:
- Adaptive: Displays up to 12 presenters in a dynamic layout feature different size frames. This layout uses AI to automatic adjust the layout and camera views based on speaking order, speaker engagement and microphone muting.
- Filmstrip: Displays up to 8 speakers with one large frame or up to 20 speakers in two different layouts, allowing for one or two large frames. Additional presenters appear in a filmstrip below the large frames.
- Grid: Displays up to 3, 4, 9, 16, or 20 presenters in equally-sized frames.
- Individual: Displays one presenter at a time. This is the default layout.
- 1:1: Display one presenter in a full screen view with another presenter in a smaller picture-in-picture frame.
- Duo: Displays 2 presenters side-by-side.
- Speaker: Displays 10, 13, or 20 presenters in a variety of layout option combining large and small frame
Select on a layout option and click Save to enable it on your event.
How the Video Bridge Fills the Stage
The frames in the layout are initially filled in the order that presenters join with a webcam. The number of available spots on stage depends on your selected layout. The Video Bridge doesn't set aside empty frames; instead it adds frames as needed, for each presenter.
Note: If a presenter joins with a webcam and then turns off their webcam, they will be hidden from display in the selected layout.
- By default, the Individual webcam layout is selected and the first presenter who joined is displayed on stage.
- In Grid layouts, frames are filled from left to right, one row at a time. Once a row is filled, a new row starts below the previous one. The first presenter to join with a webcam is in the top left frame.
- In Filmstrip layouts, the first one (or two) presenters who joined are displayed in the large frames, and remaining presenters fill the filmstrip from left to right, in the order they joined. Like grids, a new row starts once the first row is filled. The filmstrip has seven frames per row. The 20-presenter filmstrip has three available rows.
- In Speaker layouts, the first one (or two) presenters who joined are displayed in the large frames, and remaining presenters fill from left to right, one row at a time.
- In Adaptive layout, the first two presenters who joined are displayed in the large frames, the next three presenters will appear in medium size frames, and the remaining presenters appear in small frames.
- In Duo layout, the first two presenters who joined are displayed in the frames.
That's the initial order. Now let's look at voice-activated camera switching.
Voice-Activated Camera Switching
Voice-activated camera switching tracks when presenters speak and keeps a history of most to least-recent speakers. It uses this information to adjust who is on stage and makes sure the active talker is visible. This varies depending on the webcam layout you select.
When there are more presenters than spots available, other presenters remain off-stage until they speak. Then, voice-activated camera switching moves them to the stage, bumping another presenter off.
- In the Individual layout, the active talker replaces the presenter that spoke previously.
- In Grid layouts, presenters remain in their own frames while speaking. If an off-stage presenter speaks, that presenter moves to the grid, replacing the presenter who spoke least recently, no matter where they are in the grid.
- In Filmstrip layouts, the active talker is displayed in a large frame above the filmstrip. In the two-frame layout, the large frames show the active talker and the presenter who spoke immediately before. The filmstrip shows a history of presenters who have spoken, left to right from most to least recently.
- In Speaker layouts, the active talker is displayed in a large frame. In the two-frame layout, the large frames show the active talker and the presenter who spoke immediately before. The additional frames shows a history of presenters who have spoken, left to right from most to least recently.
- In the Adaptive layout, the large frames show the active talker and the presenter who spoke immediately before. The additional frames shows a history of presenters who have spoken, top-to-bottom and left-to-right from most to least recently.
- In the Duo layout, the frames show the active talker and the presenter who spoke immediately before.
When a person in the filmstrip or speaker layouts speaks, they move to a large frame and the person previously in that frame moves to the first spot in the filmstrip, shifting other presenters to the right. In the two-frame layout, the presenter in the large frame who spoke less recently is replaced.
Prioritizing Presenters on Stage
The Spotlight feature can be used to pin a presenter as the primary video in a layout, whether they are speaking or not. To spotlight a speaker, click on the star icon next to the presenter in the Presenter list.

When a presenter is spotlighted, the star icon next to their name will be highlighted. Click on this icon to remove the spotlight.

Multiple presenters can be spotlighted if required. This can be used for layouts featuring two (or more) large frames. Spotlighted speakers will appear in the order the Spotlight was added.
Hiding Presenters on Stage
If you want to hide a presenter from appearing in the video stream, their camera needs to be disabled. Presenters can hide their camera locally using the camera icon along the bottom of the Video Bridge.
Administrators can also hide any presenter's camera themselves. Click on the camera icon next to the presenter in the Presenter List.

When a presenter's camera is muted, the camera icon next to their name will be highlighted. Click on this icon to unmute their video.

Note: An administrator's mute/unmute camera controls operate independently from a presenter's local controls. If a presenter mutes their camera locally, an administrator can't unmute them and vice versa.
Change the Presenter Webcam Layout on the Video Bridge
Change the webcam layout to display more presenters during the Live event. By default, the Individual layout is selected and displays the active talker to the audience. You can change this layout before the event begins and switch layouts any time during the Live event. To learn more about presenter webcam layouts, see About Presenter Webcam Layouts.
Voice-activated camera switching is used to displays the active speaker (and recent speakers when using the Grid or Filmstrip layout). To display specific presenter webcams to the audience, see Spotlight Presenter Webcams on the Video Bridge.
Note: Only Hosts can change the presenter Video Bridge layout. To allow a presenter to change the layout, promote them to the Host role using the settings next to a speaker in the Presenter list.
To change the presenter Video Bridge layout:
- To access layouts, click on the gear icon in the top right of the Video Bridge and select the Meeting Layout text.

- Select from the available layouts by clicking on the thumbnail.
Layout options include:
- Adaptive: Displays up to 12 presenters in a dynamic layout feature different size frames. This layout uses AI to automatic adjust the layout and camera views based on speaking order, speaker engagement and microphone muting.
- Filmstrip: Displays up to 8 speakers with one large frame or up to 20 speakers in two different layouts, allowing for one or two large frames. Additional presenters appear in a filmstrip below the large frames.
- Grid: Displays up to 3, 4, 9, 16, or 20 presenters in equally-sized frames.
- Individual: Displays one presenter at a time. This is the default layout.
- 1:1: Display one presenter in a full screen view with another presenter in a smaller picture-in-picture frame.
- Duo: Displays 2 presenters side-by-side.
- Speaker: Displays 10, 13, or 20 presenters in a variety of layout option combining large and small frame
- Select on a layout option and click Save to enable it on your event.

Spotlight Presenter Webcams on the Video Bridge
Voice-activated camera switching is used by default to control which cameras appear to the audience.
The Spotlight feature can be used to pin a presenter as the primary video in a layout, whether they are speaking or not. To spotlight a speaker, click on the star icon next to the presenter in the Presenter list.

When a presenter is spotlighted, the star icon next to their name will be highlighted. Click on this icon to remove the spotlight.

Multiple presenters can be spotlighted if required. This can be used for layouts featuring two (or more) large frames. Spotlighted speakers will appear in the order the Spotlight was added.
To learn more, see About Presenter Webcam Layouts.
Hiding Presenters from Appearing on the Video Bridge
If you want to hide a presenter from appearing in the video stream, their webcam needs to be disabled. If a presenter's camera is disabled, their video will not be visible and they will not appear in the selected layout.
Presenters can hide their camera locally using the camera icon in the lower right of the Video Bridge.

Administrators can also hide any presenter's camera themselves. Click on the camera icon next to the presenter in the Presenter List.

When a presenter's camera is muted, the camera icon next to their name will be highlighted. Click on this icon to unmute their video.
Note: An administrator's mute/unmute camera controls operate independently from a presenter's local controls. If a presenter mutes their camera locally, an administrator can't unmute them and vice versa.
Screen Sharing on the Video Bridge
Screen Sharing Setup
The ability to share your screen sharing with viewers is controlled using the Display Content Share on Webcast checkbox on the Player and Branding Options page of the setup. Screen sharing is automatically enabled on all Video Bridge events. Depending on the requirements for your event, screen sharing can be disabled in the event setup using this checkbox. 
Notes:
- This setting can be enabled/disabled once the event has started.
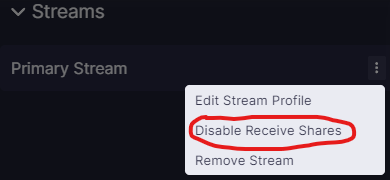
If you want to change this setting during the event, click on the settings button next to the Primary Stream (or Backup Stream) and select the Disable Receive Shares option. This setting can be re-enabled at any time by returning to this menu. The stream needs to be connected in the Broadcast Controls window before this option is available.
When enabled/disabled, a private notification will appear at the top of the Video Bridge preview to confirm:

- Screen sharing will only be disabled by default if the event is created using a template that does not have screen sharing enabled. Copied events will have screen sharing enabled by default regardless of if the original event included screen sharing.
Video Bridge Controls
In the controls along the left side of the Video Bridge window, each presenter has the option to share their screen. Click on the screen share icon to share your screen with viewers at any time during the event.

Note: If you do not see the option to share your screen, please make sure you are using a supported browser and the hardware acceleration setting is enabled. To confirm if hardware acceleration is enabled, follow the instructions below:
Chrome Browsers:
- Launch Chrome, then select “Menu” > “Settings“.
- Scroll down to the bottom and select the “Advanced” option.
- Scroll to the “System” section and toggle “Use hardware acceleration when available” on or off as desired.
- You should now be able to join your event once Google Chrome restarts.
Edge Browsers:
- Click on the Settings and more (Alt+F) 3 dots menu icon, and click/tap on Settings.
- Click on System on the left side.
- Turn on Use hardware acceleration when available for what you want on the right side.
- Click on the Restart button to apply.
Contact Support for additional help.
How to Screen Share
When sharing your screen, a pop-up window will appear allowing you to select what content you want to share. Select one of the tabs along the top: a Chrome Tab, Window (or application), or your Entire Screen.
Under the selected tab, choose one of the available options and click Share to make your screen share active to viewers.
Notes:
- This setting can be enabled/disabled once the event has started.
If you want to change this setting during the event, click on the settings button next to the Primary Stream (or Backup Stream) and select the Disable Receive Shares option. This setting can be re-enabled at any time by returning to this menu. The stream needs to be connected in the Broadcast Controls window before this option is available.
When enabled/disabled, a private notification will appear at the top of the Video Bridge preview to confirm:

- Screen sharing will only be disabled by default if the event is created using a template that does not have screen sharing enabled. Copied events will have screen sharing enabled by default regardless of if the original event included screen sharing.
Video Bridge Controls
In the controls along the left side of the Video Bridge window, each presenter has the option to share their screen. Click on the screen share icon to share your screen with viewers at any time during the event.
Note: If you do not see the option to share your screen, please make sure you are using a supported browser and the hardware acceleration setting is enabled. To confirm if hardware acceleration is enabled, follow the instructions below:
Chrome Browsers:
- Launch Chrome, then select “Menu” > “Settings“.
- Scroll down to the bottom and select the “Advanced” option.
- Scroll to the “System” section and toggle “Use hardware acceleration when available” on or off as desired.
- You should now be able to join your event once Google Chrome restarts.
Edge Browsers:
- Click on the Settings and more (Alt+F) 3 dots menu icon, and click/tap on Settings.
- Click on System on the left side.
- Turn on Use hardware acceleration when available for what you want on the right side.
- Click on the Restart button to apply.
Contact Support for additional help.
How to Screen Share
When sharing your screen, a pop-up window will appear allowing you to select what content you want to share. Select one of the tabs along the top: a Chrome Tab, Window (or application), or your Entire Screen.
Under the selected tab, choose one of the available options and click Share to make your screen share active to viewers.
Notes:
- When sharing your Entire Screen or a Chrome Tab, use the "Also share system audio" toggle share your computer's audio along with your screen.
Once active, viewers will see the selected screen share application, a small window in the top right with the camera for the presenter sharing their screen, and a shared audio feed from the video bridge. Presenters should minimize their Live Studio and begin their screen share. Once complete, click Stop Sharing to end the screen share.
- When screen sharing, a picture-in-picture window of the presenter's video normally appears in the upper right corner. If voice-activated switching is disabled, the PIP video isn't shown, it's only the content share.
Video Bridge Mini-View
On a Video Bridge event, when you navigate to another tab in the Live Studio (other than the Video Bridge tab), you will see a mini-view of the Video Bridge. This window is designed to allow you to preview the video at any time and quickly access the Video Bridge controls if need.
The min-view window is a fixed size and will display in the upper right of your screen by default. Click on the Video Bridge bar to minimize the mini-view window to allow easier access to the Live Studio. Click and drag the mini-view window if you would like to move the window to another location in the Live Studio.
The self-preview will be hidden by default in the mini-view window. Click on the arrow icon to display your local camera preview in the mini-view window.
Note: The self-preview may now overlap with the main video in this mini-view window.
If you would like to hide your self-view from displaying in the mini-view, hover your mouse over your video stream and click the hide self-view button. This will allow you an uninterrupted view of the primary video preview.
Help Video - Video Bridge Training for Administrators/Hosts
With the Video Bridge, you can broadcast your video stream from a webcam, video conferencing system (SIP/H.323), on-site encoder (RTMP), or meeting apps such as Skype for Business. In this video, Admins/Hosts will learn how to connect your video source, manage other presenters, and deliver a Video Bridge event to your audience.
Help Video - Video Bridge Training for Guest Presenters
With the Video Bridge, you can broadcast your video stream from a webcam, video conferencing system (SIP/H.323), on-site encoder (RTMP), or meeting apps such as Skype for Business. In this video, Guest Presenters will learn how to connect and share their camera and microphone on the Video Bridge.
Help Video - Video Bridge Testing
With the Video Bridge, you can broadcast your video stream from a webcam, video conferencing system (SIP/H.323), on-site encoder (RTMP), or meeting apps such as Skype for Business.
In this video, you will learn how to test your camera and microphone connection to the Video Bridge. It's recommended to test at least 48 hours in advance using the same computer and network that you plan to use for the live event.
Video Bridge Presenter Management Best Practices
There are two primary methods for managing presenters on stage during your event. Select the one that makes the most sense for your run of show plan for best results. Review these procedures with your presenters prior to the event start to ensure everyone has a clear understanding of what they are expected to do.
Host Managed
In this workflow, all presenters connect their cameras before the event starts and keep their cameras ON throughout the event. This puts control in the hands of the host to easily manage the event flow from the presenter list. They can move presenters on and off the stage and change layouts as needed for a scripted and seamless run of show.
Self Managed
In this workflow, all presenters turn their own cameras on only when they wish to be on stage. Otherwise, they keep their cameras off. This puts the control in the presenters hands and allows for a more fluid conversation throughout the event.
Also see, general presenter best practices.
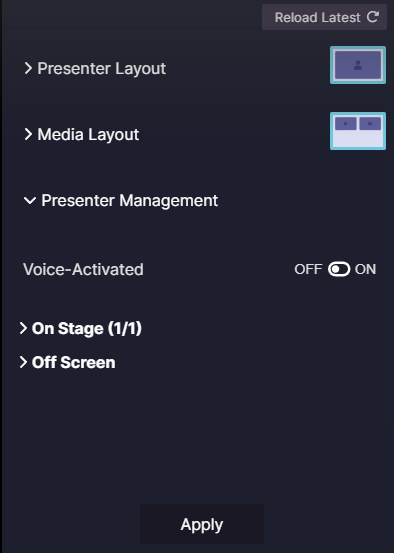
Video Bridge Control Room Settings
To access the Control Room, click on the monitor icon in the Video Bridge menu. The Control Room interface allows advanced users to build entire shots ahead of time and apply changes seamlessly, all at once. This allows you to pre-select the Video Bridge layout, the webcast player layout and manage the presenters that will appear in the selected layout. This setting is only available to Admins and not guest presenters.

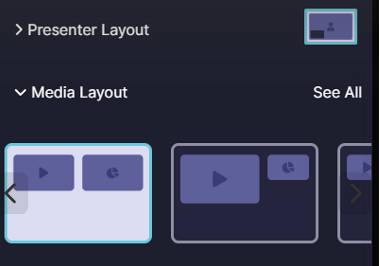
Click on the Presenter Layout text to select a layout for the Video Bridge. Click on the arrow icons to scroll through the available layouts or click See All to display all layout options.
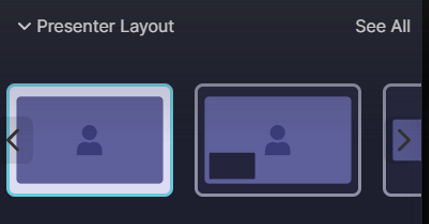
Click Back to return to the main menu.
Click on the Media Layout text to select a layout for the webcast player. Click on the arrow icons to scroll through player layouts or click See All to display all layout options. Click Back to return to the main menu.
Click on the Presenter Management text to display options to manage which presenters appear in the Video Bridge layout. Voice-Activated switching is used by default, so the active speaker and most recent speakers will appear. Disable voice activated switching to manually place presenters on stage in the desired order. Click on the + icon next to a presenters name to add them to the select layout or click on the x icon next to their name to remove them from the layout. You can also drag and drop presenters between On Stage and Off Screen. All other available presenters show in the Off Screen list.
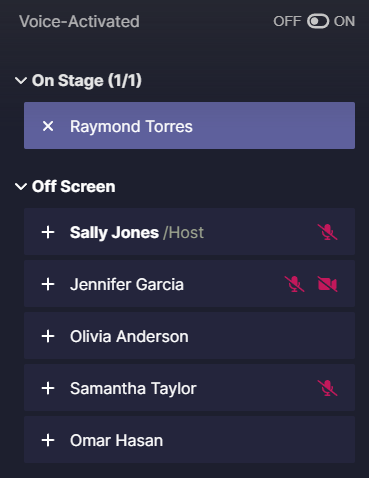
When disabled, existing spotlighting will no longer be active. The audio/video status of all presenters will appear in this view, but will not be clickable here. Note that the adaptive layout is only available when voice activated switching is enabled.
As you make changes to the settings, you'll see Reload Latest text in the top right. Click here to reset to the current layout settings that are active on the event. Click Apply to save changes to all of these settings with a single click.