Attendee Portals
- Add events to a portal
- Add breakout sessions to a portal
- Auto-fields for event details on a portal
- Have viewers register for individual events on a portal
- Sort events and breakout sessions into categories
Add events to a portal
With a portal, viewers can register one time and attend any of the events on the portal. After you select a portal layout, start adding events (segments) to your portal from the Manage Segments tab. You can include Live, Simulated Live, and On-Demand (replay) events and include a description for each event you add.
Note: An event can be linked to only one portal at a time. If you want to add an event that is used on another portal, go to that portal and remove the event first.
To add events to a portal:
- Sign in to the Webcast Admin portal and edit the portal.
- On the left panel, click the Manage Segments tab.
- At the top right of the tab, click Add Segments.
The page lists events that are not linked to other portals.
- Select the events you want to include and then click Select Events and Folders.

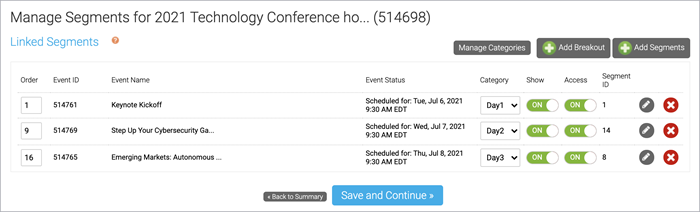
The selected events display on the Manage Segments tab under Linked Segments.

- Click the Edit button next to an event to add a description. The description displays under the title of the event on the portal. After adding a description, click Save Changes.

- Click Save and Continue to save the events to the portal.
Once you've added events, you can sort them into categories and hide or restrict access to them.
Add breakout sessions to a portal
Engage your viewers and allow viewers to attend breakout sessions from the portal agenda page. After you select a portal layout, you can start adding breakout sessions (segments) to your portal from the Manage Segments tab and link them to any meeting app you choose, including GlobalMeet Collaboration, Zoom, Microsoft Teams, and more. Breakout sessions display in the list of events on your portal.
Note: Viewers can access your meeting room link before the scheduled breakout session time. Ensure that your meeting has security features, such as a waiting room, turned on to prevent guests from joining early. Or, you can hide the View Now button after you've created the breakout session.
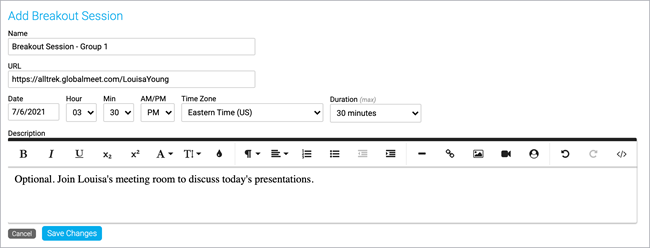
To add a breakout session:
- Sign in to the Webcast Admin portal and edit the portal.
- On the left panel, click the Manage Segments tab.
- At the top right of the tab, click Add Breakout.
- Enter a name for the session and your meeting link, schedule the breakout session, and optionally add a description.

- Click Save Changes to save the session. Then click Save and Continue to save changes to the portal.
Once you've added the sessions, you can sort them into categories.
Auto-fields for event details on a portal
Jump to: Auto-field Reference | Customization Example
The portal agenda displays specific details about each event, or linked segment. It uses auto-fields - that is, placeholders or variables - to pull in specific details about each event. By default, the agenda includes the date, title, and description for the event, with View Now and Add to Calendar buttons.

To customize the details displayed, go to the Portal Layout tab and under Segment Formatting select Custom. This opens the Content Editor, where you can add and apply styling to auto-fields as well as include text, images, and other elements. Available auto-fields are displayed below the edit area.
Important: Segment formatting sets the content displayed for every event. Only include text or images that you would like repeated with each segment block.
Auto-field reference
The format of an auto-field is __AUTOFIELD__ (the auto-field with two underscores before and after).
The following table explains the available auto-fields and the text they display.
| Auto field | Description |
|---|---|
| __SEGMENTDATE__ | Scheduled day, date, and time |
| __SEGMENTTITLE__ | Event title |
| __SEGMENTTIME__ | Scheduled time |
| __SEGMENTDESCRIPTION__ | The description you entered on the Manage Segments tab |
| __SEGMENTVIEWBUTTON__ | View Now button |
| __SEGMENTREMINDERBUTTON__ | Add to Calendar button |
| __SEGMENTLIVENOW__ | Add a live indicator to events on the portal when their scheduled date and time arrives |
Per-event registration
If you are using per-event registration, you can add event registration to the main registration page. This lets visitors register for the portal and specific events at the same time. For more information, see Have viewers register for individual events on a portal.
On the Registration tab, scroll to Customize Event Landing Page and next to Landing Text, select Custom.
The following table explains the available auto-fields.
| Auto field | Description |
|---|---|
| __ALLSEGMENTS__ | All events linked on the portal |
| __SEGMENTBLOCK1__ | The first event linked on the portal, based on the order you set on the Manage Segments tab |
| __SEGMENTBLOCK2__ | The second event linked on the portal |
| __SEGMENTBLOCK3__ | The third event linked on the portal |
| __SEGMENTBLOCK4__ | The fourth event linked on the portal |
| __SEGMENTBLOCK#__ | The Nth event linked on the portal |
Customization example
This example adds text before the __SEGMENTTIME__ auto-field to update the first line of each segment block. By default, text on the first line is smaller than other details. In the Content Editor, we selected the updated line and clicked the Text Size (T) button to increase the font size.

Have viewers register for individual events on a portal
Available with Simple List and Custom portal layouts (on the Portal Layout tab).
With a portal, your viewers register one time and can attend any of the events after signing in to the portal. If you want, you can add checkboxes to the portal agenda and let viewers register for the events they plan to attend.
When a viewer enters a specific event from the portal, their registration data is included in the event's reports.
Enable registration checkboxes
On the Portal Layout tab, select Simple List or Custom layout and select Show Checkboxes on Registration.
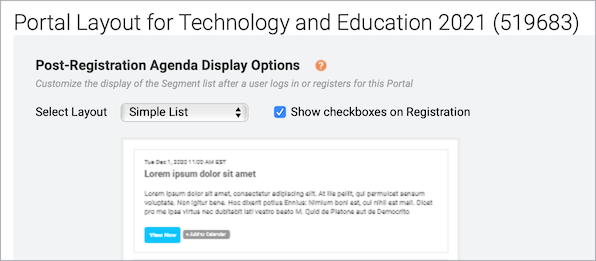
You can use the provided agenda format or scroll to Segment Formatting and select Custom.
What your viewers see
On the portal agenda, viewers initially see a list of events with check boxes. They select each event they plan to attend and then click Register for Selected Events. Registered events are listed events at the top, followed by additional event they could register for.

Example code
Here is the coding from the previous example.
<div style="border:1px dotted #ccc; padding: 16px; margin-bottom:10px;"> <div style="width:auto; float:left;"><span style="font-size:20px;">__SEGMENTTITLE__</span></div>
<div style="float:right; text-align:right;">__SEGMENTVIEWBUTTON__</div>
<div style="clear:both; float:left;"><span style="font-size:12px;">__SEGMENTDATE__</span></div>
<div style="float:left;"><span class="reminderButton" style="margin-left:6px;">__SEGMENTREMINDERBUTTON__</span></div> <div style="clear:both;"><span style="font-size:14px;">__SEGMENTDESCRIPTION__</span></div>
</div>
To use this formatting:
- On the Portal Layout tab, scroll to Segment Formatting and select Custom.
- At the right side of the editor, click </> to switch to code view.
- Delete all the placeholder code.
- Paste the example code.
- Click Save and Continue.
Sort events and breakout sessions into categories
After you add events and breakout sessions to the portal, the portal automatically sorts them by their scheduled date and time. Depending on the portal layout you select, you can further group your events with automatic grouping and sort events into tabs by broadcast date or into custom categories (or tracks) you create.
Select a layout
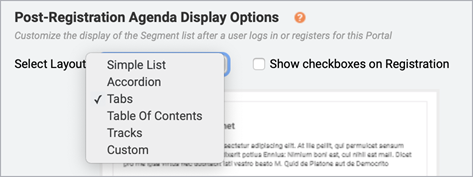
Before you categorize events and breakout sessions, you must select the correct layout.
Sign in to the Webcast Admin portal and edit the portal.
To select a layout:
- On the left panel, click the Portal Layout tab.
- Under Post-Registration Agenda Display Options, select the:
- Tabs layout to sort events into broadcast date tabs.
- Accordion, Tabs, Table of Contents, or Tracks layout to sort events into custom categories.
Note: Simple List and Custom layouts do not support automatic grouping.

- Click Save and Continue.
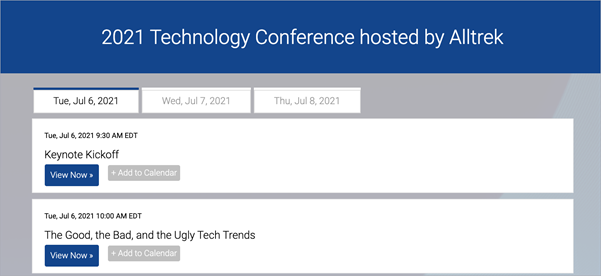
Sort with broadcast date tabs
If your conference takes place over several days, you can automatically group them into tabs with their scheduled date. If the date of an event or breakout session changes, it is automatically sorted into the correct date tab on the portal.
This is an example of a portal with a Tab layout and events sorted into broadcast date tabs.
To sort events and breakout sessions into tabs by date:
- On the left panel, click the Manage Segments tab.
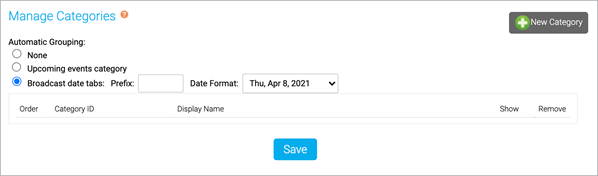
- On the Manage Segments tab, click Manage Categories.
- On the Manage Categories window, under Automatic Grouping, select Broadcast date tabs and then click Save.

- Then on the Manage Segments tab, click Save and Continue.
Sort with custom categories
Create your own custom categories to separate different conference days, topics, and more.
This is an example of a portal with a Tab layout and events sorted into custom categories.
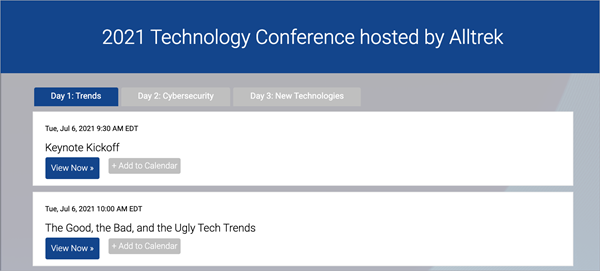
To sort events and breakout sessions into custom categories:
- On the left panel, click the Manage Segments tab.
- On the Manage Segments tab, click Manage Categories.
- On the Manage Categories window, under Automatic Grouping, select None.
- Click New Category and enter a Category ID and a Display Name for each of your categories.
The Category ID is used to assign events and breakout sessions to the category in the Webcast Admin portal and does not display on the portal agenda page. The Display Name is the title of the category that viewers see on the portal.
Note: Category IDs can't contain any spaces or special characters.

- Once you've created your categories, click Save.
On the Manage Segments tab, a new Category column displays.
- In the Category column, select a Category ID for each event and breakout session to assign them to categories.
Note: You must assign categories to all of your events and breakout sessions for them to display on the portal.

- After you've assigned your categories, click Save and Continue.